social

Facebook Twitter Blogger Pinterest Instagram YouTube

menu

About Us Contact Us News Faq Tutorials Our Shop

giveaways ad

Showing posts sorted by relevance for query Marilyn. Sort by date Show all posts

Thursday, March 22, 2012

WE'RE ON FABRIC.COM!!!!!

Shew. Glad I got that off my chest. lol.
Do you guy know how hard it was to keep that secret? We've been in talks with them since November! That's 4 loooooooong months. 

Here's the scoop: We have partnered up with and are making exclusive patterns for THE Fabric.com who will then be offering them on their website FREE for everyone! Isn't that nice of them?  If you don't know who Fabric.com is, girl, you have been missing out! Fabric.com is the place to buy fabrics from for a great price! They have all the best newly released designer fabrics, tons of novelty and character prints, and the best apparel fabrics. Tiffany and I stalk their website and purchase from them regularly.
Marilyn's Slim Fit Peasant Dress.

Thursday, January 2, 2014

Using a Rotary Cutter

Today we're going to talk about how to cut fabric using a rotary cutter. One of the things I love about PDF patterns from CKC is that many of the pattern pieces are cut out as rectangles from a cutting chart. This means less printer paper, less ink, and less pinning! The cutting process goes so much more quickly than traditional paper patterns. CKC patterns do sometimes have pieces to print, such as a sweetheart bodice or armhole curves, but most of the time we will get our pattern piece measurements right off the cutting chart, such as this one from our free Marilyn's dress pattern


Some of our new fans ask how the cutting chart is to be used, and that's what I'm going to show you today!  You can use scissors and a ruler to cut out the pieces on the chart (that's what I did for my first few) but it is much easier and more accurate if you use a rotary cutter, a cutting mat, and a long ruler.  My mat is a 36"x 24" Fiskers self-healing mat (Amazon) and it is one of the best sewing purchases I have made! My rotary cutter is also Fiskers brand. Let's get started!


The first step in using a rotary cutter is to make sure that your fabric is smooth and folded evenly, especially if you are cutting through more than one layer. In the picture above I have the fabric folded in half with the fold on the left and the selvages on the right. 

Next you will want to make sure the bottom edge of your fabric is completely straight. I usually cut off 1/4" to 1/2" to be sure. Once it is straight, line your fabric up with the bottom line and the far left line. If they aren't perfectly straight on all sides, adjust before you start cutting! 

In the picture above you can see that my fabric is flat, the bottom edge is straight, and I have it lined up in the bottom left corner. That is where I will be measuring from so I'm all ready to go.

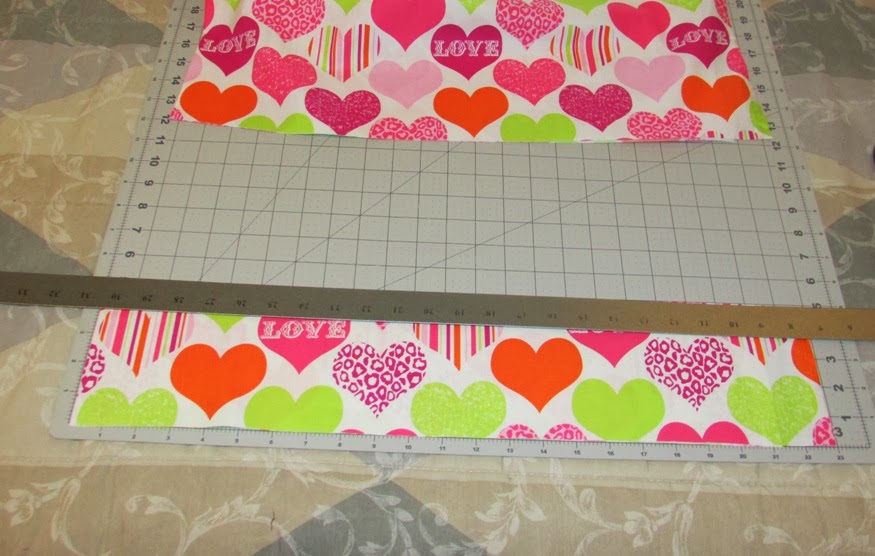
I recommend that you always cut your largest pieces first. In the Marilyn's chart above, that would be the dress pieces.  I am not cutting out Marilyn's today though - I having something else I'm cutting this fabric for and you'll get to see when I'm done.  So for today's project, I need to cut my largest piece to be 18" x 38".  For CKC patterns we always list the length before the width. Your length is always measured up and down and the width is always measured from side to side. 


My piece needs to be 18" long, so with my fabric still in the bottom left corner, I measure up 18" on my mat and lay my ruler across the fabric, making sure that it lines up with the 18" mark on both sides. I hold the ruler firmly in place and cut right along the edge using my rotary cutter. If you haven't used one before, it's just like a pizza cutter and VERY sharp. 


I now have a piece that is 18" long. Once I make the cut, I can slide the excess fabric out of the way. 

I'm not done yet though, because now I need to make my piece 38" wide.  You may remember that my mat is only 24" wide - and that is why it is useful to have our fabric folded in half!  Instead of needing a mat that is wider than 38", I only need my mat to be 19" wide. Perfect. 


I have not moved my fabric piece so it should still be lined up in the bottom left corner, but I always check to make sure it's still in the right place and that the fold is on the side I'm not cutting on.  Now I'm ready to make my piece 38" wide.  Half of that is 19", so in the picture above you can see that I lined up the right edge of my ruler with the 19" mark. (Lefties may want to line up the left side of the ruler.) Now I will use the rotary cutter to cut along that line, being sure to press enough to cut through both layers. 


Now we have a piece that is 18" x 38" just like I need. 

This is a pretty large pattern piece and we won't always need the fabric to be cut on a fold.  But here's another situation where it is good to have the fabric folded over: 


Now we're going to cut two pieces that are each 5"x 14.5". I have the fabric folded over again, and we will start out by cutting the 5" length. I lined up the ruler on both sides and I'm ready to cut. 


Now I have one very wide piece folded in half that is 5" long.  I want it to be two pieces that are 14.5" wide each.  So I will flip the fabric around so that the two edges are on the LEFT and the fold is on the right: 


I need to cut off the selvages and line up the fabric with the left line. Remember my fold is on the right now because I don't need it and will cut it off. I measure over the 14.5" and cut.  I now have my two pieces stacked and ready to go!  


Using a rotary cutter can really speed up the cutting process on multiple cuts. Moving onto our next set of pieces, you can see in the picture above that I made a cut at 6.5" long and then another cut at 13" long, without having to move the fabric. Now the ruler is lined up and ready to cut through both of them at the same time for their width.

 Once you get comfortable with the rotary cutter, you can cut out an entire outfit in hardly any time at all!  I can cut out all the pieces for Amanda's Triple Ruffle Skirt in less than five minutes. You can too, once you get the hang of it!  


Like I mentioned at the beginning, sometimes our CKC patterns do have pieces that need printed out. The pattern will explain how to use those pieces, and they are often cut right out of the rectangles that you made using the chart. Above you can see that I placed an armhole curve in the corner of my rectangle. We do recommend cutting all curves with scissors. When you are all done cutting your straight lines and pattern pieces, you will be shown what your pile of pieces should look like before you begin sewing. Here is what my pile looks like:


So there we have it!  If you have any further questions about using a rotary cutter, feel free to ask us in the CKC Pattern Group. And stay tuned for next week's Tips and Tricks blog when I show you what I'm making with the pieces we cut out! Can you guess what it is? I received these fun Michael Miller fabrics from one of our blog sponsors, Katie's Quilt Shop. Aren't they perfect for Valentine's Day? I can't wait to see how my project turns out!

Let's Create! ~ Kristen  

Friday, October 24, 2014

Attaching a Sash to a Simple Peasant Dress

Have you had a chance to try out our free Marilyn's Slim Fit Peasant Dress that's available on Fabric.com? It is the first ever CKC dress that I personally made and I instantly fell in love with it! I can't even guess  how many of these I might have made by now!  


The pattern comes with a sash and we have had many customers ask how to attach it to the dress. Actually, the sash wasn't intended to be attached and can be left off altogether.  Buuuut if you want to use the sash and have a little girl like mine who is thicker through the middle, the sash can slide right down if it's not attached! Also, some little girls are just too busy to let a sash slow them down and it's off in seconds. If you have one of these sweet darlings in your life, don't give up on the sash altogether, because today I'm going to teach you how to attach a sash to our simple peasant dress.  It's actually really easy! 


First let me say that this is definitely not the only way to attach a sash. For example, several patterns have a sash built right in, such as Hadley's Halter TopMaisy's Ruffled Tunic, and Nicole's Party Dress.  Other dresses have a separate sash that is not meant to be attached but you can easily pin the sash across the whole front bodice seam and topstitch it in place from side seam to side seam. Those are both great ways to attach a sash.  But the reason I like to do today's alternate method is because it attaches the sash only on one side seam so that when it is tied around the child, the dress will be gathered evenly all around her belly or chest, rather than being flat in front and gathered in back.  So let's get started!


Step 1: Sew the dress and sash according to instructions, with no changes. 

 (Note, the Marilyn's pattern runs from sizes 18m to 6. If you need extended sizes, Jaclyn's Jumper Dress comes with a similar layering dress in sizes 6m to 8. Use the same sash as in Marilyn's.) 


Step 2: Lay the dress out on a flat surface. On one of the side seams, measure down the amount listed in the chart below and mark with a pin, as shown with the blue line above. 


Step 3: Take the completed sash and find its seam.  Match that  seam to the side seam of the dress, lining up the BOTTOM of the sash with the place that we marked in the previous step. Note the picture above. Check to make sure that the shorter end of the sash will be in front of the dress when tying, because the longer end will go all the way around the back and to the side or side-front. 


 Step 4: Pin the sash seam to the side seam at the place we marked. 


Step 5: Now sew the sash in place by "stitching in the ditch" up and down that seam line once or twice, being sure to backstitch at beginning and end. 


And that's it! Your sash is now ready to tie!  Notice that when we place the seams directly on top of each other, a tied bow will have assymetrical bow ties like in the picture above. I do this on purpose because I love the look! But if you want your bow to be perfectly even, you can play around with the placement on the sash before you attach it. 

Good luck to your little girl in trying to take off her sash off now. 

Let's Create! ~ Kristen 

Monday, December 23, 2013

Adding a Trim Band


What a sweet little dress on a sweet little girl.  I really like the bottom trim band on her dress. I am a big fan of ruffles but sometimes it's fun to mix it up a little and use a trim band instead. Have you ever wondered how to do this? We're going to teach you how!


The easiest way to make a trim band is to use a pattern that has a ruffle at the bottom. You will cut the trim band to be the length of the ruffle, but for the width you cut it to match the width of the dress where it will attach.  (That is generally half of the width of the ruffle.)  I will walk you through the process: 


I made this dress using our free Marilyn's pattern. Instead of cutting out two ruffle pieces like it calls for, I only cut out one ruffle piece.  The one ruffle piece measures the exact width of the dress at the bottom where it attaches. 


Here is what my pile looked like before I started. Notice I cut only one ruffle piece instead of two.


Take the trim band and fold it in half width-wise and sew, creating a large loop. Do a rolled hem on one of the long edges. 


Now we are ready to pin the trim band to the dress. (We were able to skip the gathering step that we would normally do for the ruffle!)  

I wanted to show the difference between the ruffle and the trim band, so I made two dresses of the same size, side by side: 
  

 See how the dress on the left has a gathered ruffle to match the width. The dress on the right also matches the width but it was not gathered. Now both are ready to sew in place and top stitch. 


It's that easy!  They create two very different looks, don't they?  And the only difference between the two is the width of the ruffle/trim band. Time to model both dresses on my cute little neighbor girl: 


Ruffled Marilyn's 


Trim Band Marilyn's

Isn't she cute!?

If you are using a pattern that does not call for a ruffle, you can still add a trim band. Just cut fabric to be the length that you want the band to be (plus 5/8" for seam allowance and rolled hem) and then cut it to be the width of the dress where it will attach (plus 3/8" for seam allowance).  

You can add trim bands to anything you want: dresses, skirts, tops, pants - and even store-bought items. They are great for adding length and/or style.  If you have been wanting to try out our women's patterns but are afraid to wear ruffles, this is a great option! It's also good for little girls who think they are getting too big for ruffles. Switch to a trim band instead. I also like that I can reuse the same pattern to make multiple outfits for my daughter - little variations like this help mix it up a bit. I hope you'll give trim bands a try and share your photos with us when you're done.

Let's Create! ~ Kristen   

Thursday, November 21, 2013

Calculating Fabric Requirements

One of the many things I love about CKC patterns is how easy they make it for me to buy the right amount of fabric every time. Today we're going to talk about that magical chart that you always find at the top of our CKC patterns.   


Have you ever wondered how we come up with the calculations in the charts? If you assume that we're just really smart, then... you're right!  And you can be really smart too.  We will teach you how! You will benefit from knowing this because there may be times that you will want to make adjustments to the patterns and you'll need to understand how to buy the right amount of fabric. For example, my daughter is tall for her age and we like skirts to go past her knee, so I often add some inches to the length. But if I don't also calculate those extra inches into the amount of fabric I need to buy, I could come up short! 


(Here is Poppy's with three inches added to the length. No problem!) 

It can also be helpful to understand our calculations because sometimes you can double up pieces in the same yardage of the same fabric, so you won't need to buy quite as much fabric. If you know that ahead of time, you can buy less and reduce costs.  

So let's get started!  To determine the fabric requirement for each piece, we will follow three steps. I'll list them first and then explain in detail: 

Step 1: Look at the length of the piece. Write it down. This is the number that matters. 
Step 2: Look at the width of the piece. If you are cutting more than one piece and their combined widths add up to more than the width of your fabric, you will need to add their lengths together so that each piece gets the width it needs. Add those up to get your total fabric length in inches. 
Step 3: Convert the length into yards, rounding up to the nearest 1/8 yard.

That's it! 

Step 2 may seem complicated at first but it's not. Let's look more closely. To make it easy, we will be using the cutting chart from our free pattern, Marilyn's Slim Fit Peasant Dress.   


Let's look at the 18 months size and start with the Dress piece. Now follow the steps. 

Step 1: Look at the length of the piece. Write it down. This is the number that matters.   (Answer: 16")
Step 2: Look at the width of the piece. If you are cutting more than one piece and their combined widths add up to more than the width of your fabric, you will need to add their lengths together so that each piece gets the width it needs. Add those up if necessary to get your new total fabric length in inches. (Answer: Our 2 pieces are each 15" wide so they easily fit into the standard 42" or 60". Therefore we do not need to double the length. They will both fit in our 16" length.) 
Step 3: Convert the length into yards, rounding up to the nearest 1/8 yard. (Answer: 1/2 yard) 

So together we just determined that we need 1/2 yard to cut the two Dress pieces for 18 months. Is that correct on the chart way at the top? Yes, it is!

Now let's have an example where we really need Step 2. Look at the 18 month size Ruffle now.  

Step 1: The length is 3.5". Write it down.
Step 2: The width is 30" and we need to cut 2. If we are using standard woven fabric (42"), we will only be able to cut one ruffle in that width. So since we need 2 ruffles, we will need to double the length that we found in step 1.  So 2 ruffles x 3.5" length equals 7".  
Step 3: Now we need to convert 7" into yards, rounding up to the nearest 1/8 yard. That will give us 1/4 yard for the 2 ruffles.  Is that correct on the chart? Yes, it is! 

Some of the fabric lengths that we come up with may be a little harder to convert to yards in our heads. So here is a super helpful tool for helping you convert those inches into yards: 


Did you notice that we even made a column for our metric customers? 

We also made this chart into a PDF file so you can print it or keep it handy in your Dropbox. Download the Fabric Requirements Conversion Chart here

So now that you understand how we calculate the fabric requirements, you can do some adjusting of your own whenever you'd like!  Let's say that you want to make Marilyn's dress two inches longer.  No problem! Just add 2" to your length in Step 1 and make sure you follow through with Step 2 and Step 3. You will have enough fabric every time! Or let's say that you have a nondirectional fabric and you want to cut several pieces out of the same fabric and buy less overall. Just add up the lengths and widths and determine how many yards you really need. 

So now no matter what width of fabrics or what kind of prints or what adjustments you decide to make, you will always end up buying the right amount of fabric!  Isn't it fun to be smart? 

Let's Create!  ~ Kristen

Monday, November 5, 2012

Boutique Basics: How To Price Products

Shannon here and I'm baaaaaack for another installment of Boutique Basics where I help boutique owners learn the business of owning a boutique! This week we are going to be discussing something we get asked about a lot and we all HATE figuring it out: pricing products properly. So let's put our big girl pants on as well as our thinking caps and get down to business. I suggest you don't just skim over this article either; get out some paper and a pencil and really work on this. You will be thankful when it's all over and you have a plan in place for properly figuring out the pricing of your products.

Saturday, December 1, 2012

Debboutique Wins Boutique of The Month

We are excited to share with you our December Boutique of the month, Debboutique.


We've had our eye on Deborah Koch for a while, and although she started small, her boutique business has grown by leaps and bounds in the last six months due to her dedication, hard work and keen business sense. I asked Deborah to tell me her story

Thursday, May 28, 2015

How to Embellish with a Lace Insert


I love seeing how different seamstresses take the same pattern and create totally unique looks by embellishing. The sky really is the limit when it comes to our creativity! I am so excited about our tutorial today. Madeleine Trefry from Alabama Divas is here to show us how she embellishes her creations using a lace insert. Here's Madeleine!

Thursday, January 9, 2014

Guest Tutorial: Pretty Petals Flower Bow

We have decided to start hosting a guest tutorial on our blog each month. Today is the day and we are definitely starting it off with a bang!  I want to introduce you to Emily Wise from Emmie Made It, along with her Pretty Petals Flower Bow, which she will be teaching us to make today! 


Isn't this flower beautiful and unique? I was so excited to see how she made it - and it turns out that she even used peasant sleeve scraps, like the ones you will end up with after sewing our free pattern for Marilyn's Slim Fit Peasant Dress.  Who knew that we could create such a gorgeous flower out of fabric scraps?  


We're so excited to share it with you today. Emily is providing us with a free PDF tutorial that you can download here: Pretty Petals Flower Bow.  And not only that, but she also made a step-by-step video of the process! You can watch it here:  


 Wasn't that helpful?  I can't wait to make my own!  Thank you so much to Emily Wise for doing our guest tutorial today!  We hope you will show her some love on her FB page, Emmie Made It. You can also find her at Emmie Made It on Etsy. 

Let's Create!  ~ Kristen 

Thursday, February 20, 2014

Blog Contest: Use a Free Pattern!

It's time for another mini  contest here on the CKC blog!  We are going to be doing a mini contest each month now, completely separate from the traditional contests that we have always done on Facebook. Those will continue just as we know and love them -- the contests here are just a bonus! 

For today's contest we are going to ask you to sew any one item from the Tutorials page on our blog.  I'm sure you have heard of our free Marilyn's pattern and our free Taylor's pattern. But were you aware that we have SIXTY-TWO other free patterns/tutorials as well?  


That's right! We have free clothing patterns, accessories, home decor,  and even toys and other miscellaneous items. (I didn't even count all our tips and tricks posts in that number!)  We want our fans to enjoy our free patterns to their fullest so today we are going to get you up close and personal with our Tutorials page! Here's what you need to do: 

1 - Browse the Tutorials page here and choose a project that you want to make, preferably one that you have not made before.  It can be either large or small. We will choose one winner from Clothing, one from Accessories, and one from Home Decor/Kids/Miscellaneous.  

2 - Take a picture of your fabric/supplies before you start so we know that it was made this week and not previously. 

3 - Have fun sewing your project!  

4 - Take a well-lit photo of the finished product.

5 - Email your before and after photos to kristen@createkidscouture.com and be sure to include which category it is from and your name. Entries are due at 10 pm est on Wednesday, February 26.  Yes, that is less than a week for a contest but keep in mind that most of these tutorial are quick to sew and that's why we call this a mini contest. We know you can do it! 

Winners will be announced on the blog Thursday morning and one winner from each category will win a free pattern!  We will be sharing several of our additional favorite photos on the blog as well so even if you don't win you could still be featured here.


Good luck! We are excited to see what you make using our free tutorials. 

Let's Create! ~ Kristen 

Monday, May 13, 2013

Mix Match Monday

Happy Monday Y'all!
I hope you all enjoyed your Mother's day weekend and were able to snag a few patterns while we had the promo code "ILOVEMOM" for 20% off your order. If not you have until 12pm EST today. (5.13.13)

Alrighty so last week I asked for some photos of outfits that were made using multiple Create Kids Couture patterns. For Example using the bodice from Amber's Sweetheart and the skirt from Addison's triple ruffle. And you all flooded my email! So I spent a good chunk of my weekend ooh'ing and aww'ing over all of your remarkable creations. And I had such a hard time narrowing it down. But I did it. And if your photo is featured Ill be emailing you to find out your pick for your free pattern. How marvelous is it to be rewarded for your creativity?

Jenny sent me this photo that just melted my heart!! The shorts are a mix of Emma's Ruffle Butt Bloomers and Danielle's Cuffed Shorts. The top is a mix of the bodice from Addison's Ruffle Dress featuring a center accent ruffle from Serena's Stripwork, And then she used the skirt measurement from Marilyn's Free Slim Fit Peasant. Is this not an awe-inspiring outfit?

Wednesday, January 22, 2014

Converting CKC Dresses into Skirts


Oh, how I have been looking forward to this blog post! My daughter and I both love skirts. CKC has some really great skirt patterns and today I'm going to show you how even our dress patterns can be used to make skirts! There are two different ways that I like to do this conversion and I will walk you through them step by step.

But before I get to that I want you to notice the gorgeous fabrics I used!  All of the new fabric combos in this blog post came from Katie's Quilt Shop, one of our blog sponsors and a favorite store of mine. Katie is so great to work with and is even offering a coupon code to our fans! Details are at the end of the post.


 Alright let's get started. The first method we can use to turn a dress into a skirt is to mash up (or combine) two different patterns: a CKC dress pattern and a CKC skirt pattern.  The skirt above just happens to be made using my two very favorite CKC patterns! Here's how I did it:


I took the skirts from Poppy's Peekaboo Dress on the left, and instead of attaching them to the standard Poppy's bodice, I attached them to the waistband from Daphne's Bubble Skirt on the right!  I basically just opened up both patterns on my computer and followed the steps from one and then the steps from the other.  


 It is important to do a quick calculation before we begin, to make sure the finished skirt will end up the length that we want it to be. We can add the length of the waistband to the length of the skirt and then adjust either of them if necessary by adding or subtracting length. In our example here, I left the waistband exactly as it was and added three inches in length to the skirts, mostly because my daughter is tall and growing like a weed. Some may prefer it shorter - that's the beauty of sewing our own cute clothes! We both love how it turned out.


I also LOVE the bow in back of Daphne's. Now I have my two favorite CKC features all wrapped up into one skirt! It's perfect for Valentine's Day and on into the warmer months.

The best part of all this is that we can do it with any of our favorite dress patterns and skirt patterns! We have such a variety of waistbands and skirts to choose from. I use the Izzy's Skirt waistband on a lot of my skirts too.

Now on to the second method for converting CKC dresses into skirts.  For this one all we need is one dress pattern and a few instructions that I'm giving you below.


I decided to put together this part of the tutorial using Piper's Stripwork Maxi Dress. I could have chosen a much simpler one but I wanted to show that any dress can become a skirt! In this method we are basically going to use the skirt portion and create an elastic casing at the top.

Step One: Look at the type of skirt on the dress you have chosen and decide if it needs the length adjusted. For example, if the dress normally has a high bodice we may want to subtract from the skirt length. Or if the style of the dress is shorter than we want our skirt to be, we may want to add length. Make note of any changes you want to make to the skirt.

Step Two: If our model is available, we want to measure from her waistline down to where we want the skirt to end, to double check what we calculated in the first step.  If the dress has multiple tiers or ruffles, keep that in mind. Once we know how to adapt the length for our skirt, we will finally add 1 1/4" to that length, to allow for the elastic waist casing.


Step 3: Cut and sew the skirt portion of the dress according to the pattern instructions.  (I love how this stripwork looks already! Such pretty fabrics!)


 Notice that my top tier is a little longer than the other tiers. This is to allow for the casing. 


Step 4: To create our casing, we are now going to fold the upper edge in 1/4" and press. Then fold in another 1" and press.


Step 5: Stitch around the casing 1/8" up from the fold, being sure to leave a 1 1/2" opening where we will insert the elastic. 

Size
Waist Elastic
Cut 1
3/4 " wide
6-12 months
17"
12-18 months
17.5"
2T
18"
3T
18.5"
4T
19"
5T
19.5"
6
20"
7
20.5"
8
21"

Step 6: Cut elastic according to the chart above. If you don't have the chart handy each time, keep in mind that you can also measure your child's waist and subtract one inch to get this measurement. Insert the elastic, attach the ends, and stitch the casing closed. Stretch the waistband to adjust the gathers. 


And we're done!  Isn't it beautiful?  It came out to the EXACT measurement that I wanted it to be.


The twirling princess is more than happy with her new one-of-a-kind skirt.  Wasn't that fun?  I hope you will all try out making some skirts of your own!  (You can even replicate this exact skirt using Piper's pattern and Katie's fabrics!) 

One more tip I have about skirts - my daughter loves wearing them with her white Marilyn's dress, as you can see in the pictures. This free pattern can be a staple that matches almost any skirt and it also serves as an under slip. She loves that she can throw on the dress and the skirt and then add any extra accessories to make it pop. So simple and so classy!  I love the versatility of CKC patterns. 

Now let's get back to that coupon code. If you loved these fabric combos as much as I did, be sure to visit Katie's Quilt Shop!  She's dreamy to work with and she is offering our fans 10% off every purchase using the code LOVECKC at checkout. I couldn't stop smiling as I browsed her fabric lines - I definitely recommend them, especially her princesses, superheroes, and mermaids! So cute and excellent quality too. 

We hope you have learned a lot from this tutorial today. We'd love to see the unique skirts you come up with. 

Let's Create! ~ Kristen