I love seeing how different seamstresses take the same pattern and create totally unique looks by embellishing. The sky really is the limit when it comes to our creativity! I am so excited about our tutorial today. Madeleine Trefry from Alabama Divas is here to show us how she embellishes her creations using a lace insert. Here's Madeleine!
I used CKC's free Marilyn' s Slim Fit Peasant dress for this tutorial. The fabric I used is Michael Miller. The lace trim was 2 inexpensive laces I joined together. (See tutorial later in the post!)
The only thing I did differently for this dress was that I did not make the hem ruffle. Instead, I added the length of the ruffle to the front/back pieces before I cut them out, so the dress would be the correct length.
I decided to add the lace insert to the sleeves and the dress hem. You can put an insert anywhere you would like. Place the lace on the right side of the fabric.
I added the lace 1.5" above the bottom of the sleeve pieces. Pin it in place.
Straight stitch the lace on the top and bottom.
6.It's looking good.....but it's not awesome yet!
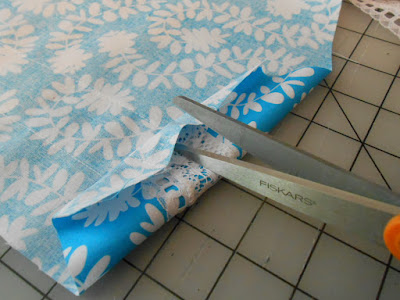
Insert your scissors carefully between the lace and the fabric.
Cut down the middle of the two seam lines you made when you sewed the lace on.
Finger press the fabric away from the lace.
Fold the edges in half and then in half again. Pin as you go. This is the same fold-over technique used when hemming.
Once both sides are folded over and pinned, you are ready to sew.
I use a basic straight stitch to sew both sides.
See the WOW factor?
On the dress front and back pieces, I added my lace at 3" from the bottom. You, of course, can add it anywhere you want.
Pin the lace and sew, cut, fold and sew the front and back pieces the same as you did the sleeves. Then sew the dress together according to the dress instructions.
The bottom hem will look like this.
And the sleeves. So pretty!
HOW TO JOIN LACES
Most machines come with this sweet little foot, called an Edge Joining Foot.
It's wonderful for stitching in the ditch, top stitching, sewing on trims and my favorite... joining lace!
We all see that tiny, narrow, pretty lace at the store. And because it doesn't cost much, we buy it. And then it sits there, mocking us for not using it. So let's make it usable!
Place the edges of 2 pieces of lace on either side of the middle plate on the foot.
Set your machine to zigzag or ladder stitch.
I use a zigzag. It is your choice; both work well.
It looks good, but let's go ahead and add some to the other side.
Same thing here, line the two laces up on either side of the middle plate, and zig zag or ladder stitch.
Perfect! It is ready to be used as an insert or trim on your favorite CKC pattern, giving it a one-of-a-kind look that only you could create.
Thank you so much to Madeleine for sharing this fantastic tutorial with us! Please go show her some love at her Facebook page, Alabama Divas. We like to support one another's boutiques and she has really cute non-sewn items as well!
I honestly cannot wait to try out this lace technique! I'm sure you agree. So as you sew up your pretty lace insert outfits, please be sure to post them in our group and tag one of us! We can't wait to see what you make.
Let's Create! ~ Kristen


