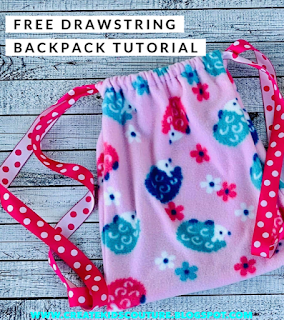
Today we have a fun and fast project perfect for beginners and great gifts for kids of any age! It comes in three sizes to fit from toddlers to adult. Fleece makes a really fun backpack, but you can make this with woven fabrics as well.
Here's what you will need to get started:
Fleece Fabric (I really love mine in fleece, but also made one in woven. I will note any changes needed for woven in the instructions.)
Cording (like parachord or a thin nylon rope) or Ribbon, Bias Tape etc.
Scissors
Pins
Sewing Machine
Note: Our seam allowance will be .5" for this project.
You can make this backpack in three sizes. Small is great for toddlers (and yes, my toddler LOVES her backpack most of all, so I'm so glad we included the small size). Medium is perfect for children, and Large is better for older kids and adults.
Cutting Chart:
Size
|
Backpack
Cut 2 (length x
width)
|
*Loop
Cut 1 (length x
width)
|
**Cording
Cut 2 (length)
|
Small
|
12” x 10”
|
6” x 3”
|
46”
|
Medium
|
15” x 13”
|
6" x 3"
|
58”
|
Large
|
18” x 16”
|
6" x 3"
|
70”
|
* We will cut the loop in half during construction so we will have two loops. If you are using woven instead of fleece, make your loop 6" x 2".
** I used cording I found in our camping supplies, but you could use anything from ribbon, piping, or even bias tape.
Construction:
If you are using woven fabric, you will want to finish the edges of your rectangles before you get started to prevent the inside seam allowances from fraying. You can do this by cutting it out with pinking shears, or using a zig-zag stitch or serger.
Step 1: First we will create the casing for the cording. Start by folding the top corners in .5" toward the wrong side of the fabric. Sometimes with fleece there is not really a "wrong side" depending on the fabric, so if it is no obvious, do not worry about that.) Pin and sew in place by sewing 2" down from the top to secure this fold.
Step 2: Fold the top down 1". Pin and sew in place. Repeat with the other backpack piece and set aside while we work on the loops.
Step 3: Next we will create the loops for the bottom of the backpack where the cording will thread through. We will do this in the same way we fold bias tape. First, fold the fabric so the raw edges meet in the center as shown here.
Step 4: Now take the folded edges and place them on top of each other so the raw edges are completely enclosed. Pin and sew along the long edge as shown below.
Step 5: Now cut this in half so you have two loops.
Step 6: We will now pin these to the right side of one of the backpack pieces .5" from the bottom raw edge. Because fleece is so thick, I prefer to place one raw edge of the loop above the other one as shown here. Sew these in place. **If you are using woven fabric, I preferred to place the raw edges of the loop on top of one another instead of separated, but either way is fine.
Step 7: Now place both backpack pieces right sides together and pin along the sides and bottom. We will sew all the way around the back, starting and stopping below the casing for the cords.
Here is a picture showing you how to sew down the sides so that the section where the fabric is folded where we made the casing will be tapered and enclosed in the seam allowance.
Step 8: Turn the backpack right sides out.
Step 9: Thread one end of one of your cord pieces through the bottom loop of the backpack.
Using a safety pin or bodkin, thread the cord through one of the top casings.
Go all the way through to the other side of the casing.
Now thread the cording through the other casing.
Now you can tie the two ends together.
This is how I did it, but you can use any method you may be familiar with. First, I started by making a loose knot with one end. Second, I passed the other side of the cord through the center of that knot. I then tied a knot around the other cord as shown in the third picture. Then I scooted the knots closer together and then pulled them tightly together as shown in the last two pictures.
Step 10: You can either burn the ends of the cording so it will not fray, or I prefer to scoot the knot through the casing and place it in the center of the casing so you cannot see it at all.
And here is one side complete!

Repeat steps 9-10 on the other side of your backpack. You're done and ready to go!

I hope you enjoy your drawstring backpack! My kids have been wearing them around the last several days. This will be a perfect gift or project for beginning sewers.
Here are some more adorable backpacks made by our amazing testers!
I am absolutely in love with Tonya's "Going to Gramma's" set using our FREE Pattern for Taylor's Pajama Pants on Fabric.com's website, which can be found by clicking the banner below.
Here are some more adorable backpacks made by our amazing testers!
I am absolutely in love with Tonya's "Going to Gramma's" set using our FREE Pattern for Taylor's Pajama Pants on Fabric.com's website, which can be found by clicking the banner below.
Please share your beauties with us and come hang out in our Facebook Group or on Instagram @CKCPatterns.
SEW Inspired ~ Emily


