I don't know about you, but I can't seem to have a conversation with anyone these days without it turning to the topic of Instant Pots! They were a hot ticket item during the holidays and if you have a new one at your house, you're sure to love it! Well, today we have a pretty accessory to add to your Instant Pot to make it feel right at home in your kitchen.
Isn't it awesome?! This cover is perfect for keeping your kitchen's decor in theme while still having your 6-quart Instant Pot handy. It also keeps out the dust and hides any fingerprints. This cover isn't heat proof and you definitely don't want it on while the instant pot while in use -- but it IS super convenient to keep your pot pretty between uses. Let's get started!
Material's Needed:
1 yard Main fabric
1 yard Lining fabric
Optional: Piping or other trim
Circle template (click here to download)
Step 1 - First, cut out whatever pretty fabric you have to match your kitchen decor, along with a lining fabric. For the lining I used felt because I wanted the cover to keep its shape and it worked nicely. You could also use a stabilizer, fleece, flannel, or cotton; just note they will all hold the shape a little different. Cut out the pieces as listed below:
Cut 1: Circle of Main Fabric
Cut 1: Circle of Lining Fabric
Cut 1: 13" x 48.5" Rectangle of Main Fabric
Cut 1: 13" x 48.5" Rectangle of Lining Fabric
(Optional) Cut 1: 50" of Piping or other Trim
Step 2 - After cutting your fabric, here are the pieces you should have. If you are not using the piping or trim, you can skip to step 5.
Step 3 - If you are using piping or trim, pin it in place around the outer edge of the main circle piece, as shown above. Overlap the ends and then trim.
Step 4 - Sew the trim in place, using a piping foot if needed. (A zipper foot also works!)
Step 5 - Take the main rectangle piece and fold it in half widthwise with right sides together. Sew along the short sides of the rectangle, as shown above, using a 3/8" seam allowance. You’ll now have one continuous loop of fabric. Repeat with the lining.
Step 6 - Pin the circle piece to the top of the rectangle like shown. Sew in place using a 3/8" seam allowance. Repeat with lining.
Step 7- Turn the main fabric right side out.
With wrong sides together, slide the lining into the main. Match up the side seams.
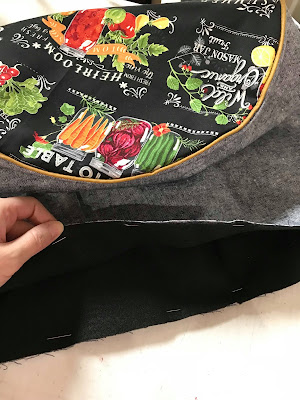
Step 8 - To finish the bottom edges, fold the raw edges in 1/2” to the wrong sides of the fabric, sandwiched between the layers, and then pin together like shown. Sew 1/8” up from bottom all the way around.
Your cover is now finished!! Way to go!
Please be sure to share your photos with us in our CKC Patterns group on Facebook. We can't wait to see!
Let's Create! ~ Kristen


