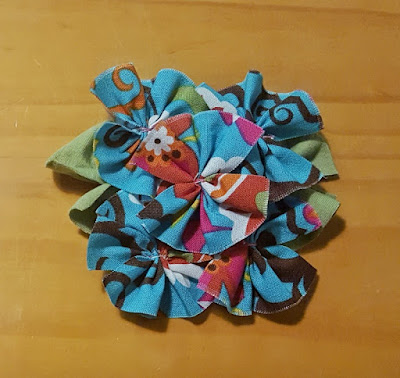
Just like there are thousands of different kinds of flowers in the world, there are also that many different ways to make them with fabric! Today we have a guest here with us to show some fun techniques for making fabric flowers using a rolled hem; plus she threw in some others that are just as adorable!
Aren't they pretty? Erica Watt from MikMak Bowtique is one of our fabulous pattern testers and I just adore the whimsical touch she created with these. The flowers can be used on dresses, tops, headbands, hair clips, backpacks, leg warmers, and more. Each one above is a little unique and if you have a favorite then you're in luck because they are all demonstrated below! You can learn different techniques from each one and then mix and match them to make your own versions. Here's Erica:
Flower #1
First, cut out your pieces:
Smaller center flower piece -- Cut one piece 2 ¼” x 3 ¼”
Larger flower petal pieces -- Cut two pieces 3 ¼” x 4 ¼”
Leaf shapes can be cut out from felt or you can do a rectangle shape 3” x 4” and run a gathering stitch down the length in the center, creating leaf petals on the ends.
Do a rolled hem around the edges of all 3 flower petal pieces.
Do a gathering stitch down the middle width (I used the longest stitch length and highest tension on my machine.)
Gather the pieces as tightly as possible to create each petal piece. Tie off with a double knot and trim thread ends.
To create finished flower, stack one larger piece on top of one another in a “X” stacking order. Put smaller petal piece on the top center. You can use hot glue or hand stitch pieces together.
Add center embellishment to flower.
Glue or hand stitch leaf shapes onto felt circle then glue the felt circle that has the leaves on it to the back of the finished flower. Add hair clip to back or attach to headband.
Flower #2
First, cut out your pieces:
Long piece used to create center flower piece -- Cut one piece 1 ¼” x 6”
Larger flower petal pieces -- Cut two pieces 3 ½” x 4 ½”
Leaf shapes can be cut out from felt or you can do a rectangle shape 3” x 4” and run a gathering stitch down the length in the center, creating leaf petals on the ends.
Do a rolled hem around all the edges of the twe main flower petal pieces.
On the long center piece, do a rolled hem on both short sides and one of the long edges.
Then do a gathering stitch down the middle width on two
main flower pieces. Do a gathering stitch 3/8” from raw edge on the long center piece. (I used the
longest stitch length and highest tension on my
machine.)
Gather the pieces as tightly as possible to create each petal piece. Tie off with a double knot and trim
thread ends.
The long piece will be used for the center of the flower, so roll it
into a circle creating a rose shape.
To create finished flower, stack one larger piece on top of one another in a “X” stacking order. Put center rose on top center.
**You can use hot glue or hand stitch pieces together.**
Glue or hand stitch leaf shapes onto felt circle ,then glue the felt circle that has the leaves on it to the back of the finished flower.
Add hair clip to back or attach to headband.
Flower #3
First, cut out your pieces:
Larger flower petal pieces -- Cut three pieces 3 ½” x 4 ½”
Leaf shapes can be cut out from felt or you can do a rectangle shape 3” x 4” and run a gathering stitch down the length in the center, creating leaf petals on the ends.
Circle shape is for the backing and can be knit fabric or felt.
Do a rolled hem around all the edges of three main flower petal pieces, pulling fabric as you go creating a slight lettuce edge.
Do a gathering stitch down the middle width on three main flower pieces.
Gather pieces as tightly as possible to create each petal piece. Tie off with a double knot and trim thread ends.
To create finished flower, stack one larger piece on top of one another each at a slightly different angle.
Put rolled center rose on top center or add a button or other embellishment for finished look of flower. **You can use hot glue or hand stitch pieces together.**
Flower #4
(Alternative Flower Using Woven Scraps)
First, cut out your pieces using woven scraps:
Cut 5 pieces W 2” x L 4”
Leaf shapes can be cut out from felt or you can do a rectangle shape W 4” x L 2 ½” and run a gathering stitch down the length in the center, creating leaf petals on the ends.
Circle shape is for the backing and can be felt which is the preferred material or you may also use knit fabric scrap.
Do a gathering stitch down the center width (1” center all the way down) on five main flower pieces. Gather down the length of the leaf pieces.
Gather pieces as tightly as possible to create each petal pieces and leaf pieces. Tie off with a double knot and trim thread ends.
Stack 4 of the 5 flower petals in a square (4 corners of the square), and then place 5th petal on the center. Place this arrangement on top of the 2 leaf pieces completing the look. **You man hand stitch this all together onto a felt back or use hot glue.**
Flower #5
(Combining several of the techniques above, this time using pinking shears for the petal edges)
Cut pieces. Use pinking shears on the long edges. Sew a gathering stitch down the center of each.
Gather pieces as tightly as possible to create each petal pieces and leaf pieces. Tie off with a double knot and trim thread ends.
Add leaves and backing.
Flower #6
(Combining several of the techniques above, this time using strips of jersey knit with raw edges left to roll up on their own, then stacked as examples shown above.)
There you go! That's all you need to know to make all these amazing flowers!
We want to give a huge thank you to Erica for sharing some of her magic with us! Be sure to go show her some love over at MikMak Bowtique.
And of course we can't wait to see the cute creations you make using these bows! When you're done, please come share your photos with us in our patterns group. We loooove seeing what you make!
Let's Create! ~ Kristen


