
It's the 2nd Day of Christmas here on the CKC blog and today our free pattern comes to you from Jessica Fulton, the head of our CKC Sew-Alongs. It's a fun one! Here she is:

Looking for an easy sewing project to make a gift for a boy
or girl? I’m here today to show you how you can whip up an easy Tic Tac Toe
game that is sure to please boys and girls alike. You can have fun making it
unique with the fabrics and trims you choose to use. Let’s begin!
Materials Needed:
- 2 – 18″ x 18″ squares of fabric for the game board
- 10 – 5″ x 5″ squares of fabric for X beanbags
- 10 – 5″ x 5″ squares of fabric for O beanbags
- 1 – ¼ yard of fabric for X’s & O’s
- 5 cups of dried beans, rice, popcorn kernels, or other filler for
beanbags
- Heat ‘N Bond Ultra (HNBU)
- X & O Template
- 2 yards bias tape, ribbon, ric rac, or other trim for
grid marks on game board
*All
seam allowances are 3/8” unless noted otherwise.
STEP 1: Print out
the X&O Template. Cut a piece of Heat ‘N Bond Ultra (HNBU) and place on top
of the template with the adhesive side facing down. Tape down the four corners.
Trace the X’s and O’s onto the HNBU. OR for a faster way, simply place the page
with the HNBU taped on it back into the printer and reprint the template page.
You will need a total of five (5) X’s and five (5) O’s.

STEP 2: Once you
have traced or printed the X’s and O’s onto the HNBU, roughly cut around
them. Place them with the adhesive side on
the WRONG side of the fabric. Iron according to the directions on the HNBU.
Then cut out the X’s and O’s. Do NOT use your good fabric scissors for this
step because you will be cutting through the paper and adhesive on the HNBU!

STEP 3: After
cutting out the X’s and O’s, peel the paper backing off and iron onto the
center of the 5” x 5” squares of fabric for the bean bags.
If you use Heat n Bond Lite rather than Ultra, you will need to topstitch around the edges of each X and O. If you use Heat n Bond Ultra, they will be secure enough without topstitching.
If you use Heat n Bond Lite rather than Ultra, you will need to topstitch around the edges of each X and O. If you use Heat n Bond Ultra, they will be secure enough without topstitching.

STEP 4: Sew
around the fabric squares with wrong sides together. Leave about a 1-2” opening
for inserting the bean bag filler of your choice. (I used popcorn kernels in
mine.) After sewing and before filling the bean bags, cut around the edges with
pinking shears. NOTE: If you prefer
a more finished look, then you can sew the fabric squares with right sides
together. Clip corners and flip using the small opening.

STEP 5: Using a
funnel, insert the bean bag filler you are using. I made a makeshift funnel out
of a piece of card stock I had laying around. I used about a ½ cup of popcorn
kernels in each of my bean bags. You do not want to overfill the bags as it
will be difficult to sew the opening closed. Also, it is more fun to play with
them if they aren’t filled to the brim.

STEP 6: After
filling the bean bags, sew the opening closed. Take care to backstitch at the
beginning and end to ensure that the opening is closed sufficiently.
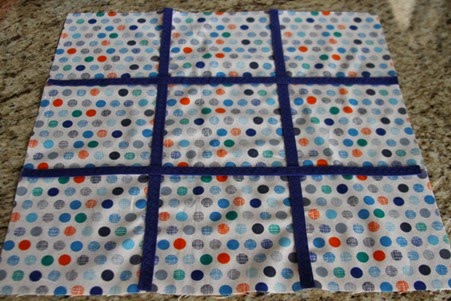
STEP 7: Take one
of the 18”x18” pieces of fabric for the game board. Draw a vertical line at the
6” and 12” point on the fabric. Or you can do this the very unscientific way
that I did and simply fold your fabric into thirds and press with an iron to
create your grid marks. J
Sew the bias tape or whatever trim you are using down. I used the widest zig
zag stitch on my machine to sew the bias tape on my board.

STEP 8: Flip the
board piece around and repeat Step 7 to create the grid marks at the 6” and 12”
points.
STEP 9: Take the
second piece of 18”x18” fabric and place on top of the Tic Tac Toe grid you
just created in Steps 7-8. Ensure that the fabrics are facing right sides
together and then sew all around leaving about a 2-3” opening for turning.
After sewing clip corners.

STEP 10: Flip the
game board so right sides are showing. Iron edges well, then topstitch 1/8” all
the way around the board to close the opening you used for turning. Now you have an adorable Tic Tac Toe game that
is sure to delight your child!
