
Last week in our patterns group we had somebody asked how to apply bias tape properly. I thought it would be a fun skill to teach this week, and why not do it using a FREE (and super cute) pattern while we're at it? So here's what I whipped up for you today:

I don't know about yours, but my babies were clever little things! I couldn't keep any bibs on their necks if they were the kind that fastened with velcro or snaps. Believe me, I tried. So I resorted to the kind of bib that ties in back, and I found that I loved them more anyway!

For this style of bib you can use just about any fabric you want to. If you want a waterproof backing, you can use PUL fabric that is soft on the front and laminated on the back. (I know BWD Fabrics has some cute PUL fabrics.) You could also use terry cloth, or upcycle a towel to make several bibs. Knit fabric makes really soft bibs, or you can even use flannel or cute quilting cottons. For any of these fabrics you can use one or two layers, depending on whether you want your bib reversible. The instructions below work for both.
Supplies Needed:
1/4 yard fabric
1 package of 1/4" wide double-fold bias tape
Sewing machine, pins, thread, scissors
Let's get started!

Step 1: Print the pattern piece, cut it out, pin it to your fabric, and cut around it. If you're making a second layer, cut a second bib piece.
Cut two strands of double-fold bias tape that are 25" long each.

If you are making a single layer bib, skip to the next step. If you are making a double-layer bib, place the two layers with wrong sides together and baste them together close to the edges all around, as shown above.

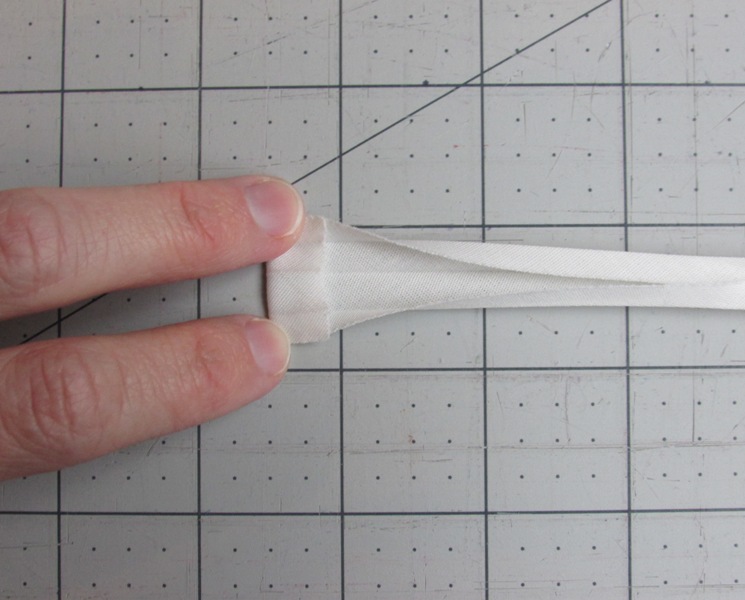
This is where the proper technique for bias tape comes in. Take a look at the end of the bias tape above. You will see that there are two sides folded into the center.

Notice that one of the sides is a bit wider than the other. You can see it in the photo above. This is important!

With the bib laying back-side-up, match the raw edge of that wider side to the outside edge on the bib, starting at the upper point. Pin it in place. See photo above.
Note: The short end of the tape can start before the edge, allowing a little wiggle room; you won't run out of tape on the other end. Just be sure that the long raw edges of the tape and the bib match up exactly!

Follow the curve of the bib piece to continue pinning the raw edge of the tape to the raw edge of the bib. Because the tape is cut on the bias, it should "stretch" easily around the curves.

Continue pinning around all the edges/curves until you get to the other point of the bib. Be sure to use plenty of pins on the corners, although I probably didn't need to use quite so many on the straight edges. This process is a lot faster than it may appear.
You can trim the long excess of tape at this point, but don't trim too close to the bib -- it's still good to have a little extra on each end.

On the back side of the bib, sew directly down the crease that is closest to the raw edge, as shown above. You will sew right down the center of that crease all the way around the bib edge that you pinned, removing pins as you go.

The back of your bib will look something like the photo above.

Turn your bib to the front side. This is the fun part! Beginning at the top, pull the fold of the bias tape out around the edge, and up onto the front side of the bib, barely overlapping the stitching on the front. Pin in place. Continue pinning all around the bib, until the tape fold is all secure on the front.

Carefully sew close to the inner fold, removing the pins as you go. Be careful not to go over the edge or go in too far -- you just want a consistent stitch close to the inner edge, because the stitching will show on the back too.

When you're done, the stitching will look something like this on the back. (This is why it was important to start with the wider edge of the bias tape on the back!)
Now is a good time to trim both ends that you sewed on, so they are even with the edges of the bib.

Now you're ready to add the second strand of bias tape to the top of the bib, which will also serve as the ties. Fold the tape in half to find the center, open it up as shown above, and mark it with a pin.
On one of the ends of the tape, open up the folds so it is flat and then fold about 1/2" to the inside. See photo above.

Refold the tape with the end enclosed so there are no raw edges remaining. Pin it in place.
Repeat on the other end of the tape, so both ends will be pinned neatly.

Lay the bib out with its back side facing up. Find the center point of the raw edge by folding it in half. Match the center pin of the tape to the center of the bib. Pin in place, making sure you again put the wider edge of the bias tape next to the raw edge!

Continue pinning the raw edge of the bias tape to the raw edge of the bib, following the curve and using plenty of pins.

Sew along the crease of the tape that is closest to the edge, just as you did before. You only need to sew the part of the tape that will attach directly to the bib.
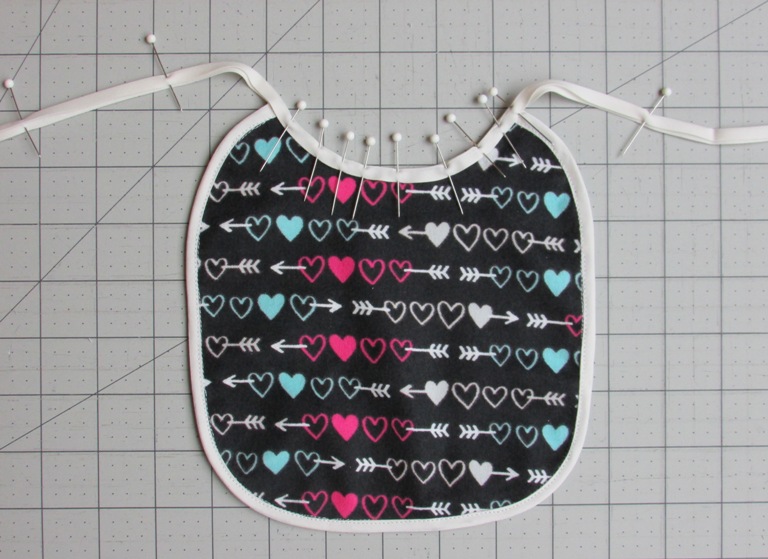
Turn the bib to the front side. Pull the folds out and around, and pin on top covering the stitching, just as you did before. After you have all the tape fold pinned to the bib edge, add a few pins to the excess tape, which will become the ties. You don't need a lot of pins on the ties -- maybe just a couple, as shown above.

Starting at one of the intersections of the bib, sew along the inner edge of the bias tape close to the fold, around the neck curve of the bib and all the way up to the end of the tie. See photo above.

Then starting at the same intersection, sew up the remaining tie close to the fold, all the way up to the end of the tie.

That's it! You are now done! Not only do you have a super adorable bib you just made, but you also learned how to apply double fold bias tape using the proper technique! Way to go!
My only regret with this blog post is that I don't have a teeny baby to put this bib on. I think my 4 year old might protest if I tried it! So if you love this bib tutorial as much as I think you will, be sure to get a photo of your new bib on your own little baby and share share share!
Let's Create! ~ Kristen
ps -- If you loved this tutorial, be sure to check out the adorable keyhole sleeve detail on Candice's Top and Dress! Also, you can learn to make your own bias tape here!
ps -- If you loved this tutorial, be sure to check out the adorable keyhole sleeve detail on Candice's Top and Dress! Also, you can learn to make your own bias tape here!