🎶On the 10th Day of Christmas CKC gave to me🎶
A FREE Pattern for an Ice Cream Cozy!
Today we have an amazing tutorial from our very own tester, Ashley! This is such a fun project and will be the perfect holiday gift for any ice cream lover. I know they'll be using it year round! Let's get started!
Materials:
- Printed template
- Fabric for the outer layer: approximately 6”x12”
- Fabric for lining: approximately 6”x12”
- Fabric for handle and bottom straps: 10”x3”
- Optional inner insulating layer: approximately 6”x12”
- Sewing machine, thread, scissors, iron, clips or pins, ice cream pint
Directions:
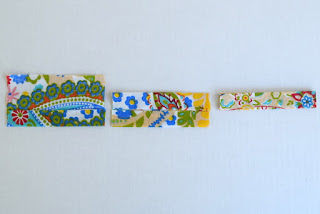
Step 1: Print the template and cut out the pieces. Lay your main and lining fabrics on top of one another then top with the insulating layer if using. Place the template for the band on top. Cut out around the template through all layers. Transfer the markings along the bottom edge of the template to the outer band piece. If you cut an insulating layer, trim 3/8” off each edge (of the insulating layer only) so that the insulating layer is not sewn into the seam allowance of the band. Next, cut your two bottom strap pieces and handle piece. You will end up with a pile similar to this:
Step 2: If you are adding an insulating layer, continue below. If not, skip to step 3. Adhere your insulating layer to the wrong side of either the lining or the outer band. If you chose fusible fleece, follow the package instructions to fuse it to wrong side of the lining or outer fabric. If your insulating material is not fusible, attach using a few lines of stitching in whatever pattern you want. You can get creative and do fancy quilting, or keep it simple as shown here with a few vertical lines. If you don’t want a quilted look on the outside of your cozy, then sew the insulating layer to the lining.
Step 3: Prepare the bottom straps and handle by folding in the same manner as bias tape. For all three pieces, first fold the bottom long edge up to the middle and press. Then fold the top long edge toward the middle and press. Then fold in half and press. Sew down both long edges. Set the two straps and handle aside.
Step 4: Place the outer band fabric right side up. Lay one bottom strap on top of the left mark along the bottom edge, right sides together. Lay the second strap on the center mark, right sides together. Pin or clip in place then baste together using 1/4” seam allowance.
Step 5: Fold the outer band fabric in half, right sides together. Sew along the short raw edge to create a loop. Repeat with the lining. Press seams open. Remember if you are using fleece, you need to use the lowest setting on your iron or finger-press only.
Step 6: With the wrong side of the handle touching the right side of the outer band, pin or clip the handle on top of the seam you just created then baste in place using 1/4” seam allowance along the top and bottom short edges of the handle.
Step 7: Press the top raw edge down 3/8” toward the wrong side of the outer band piece. Repeat with the lining.
Step 8: With the outer band wrong side out, grab the bottom strap located opposite the handle, and bring the edge across to meet the handle and pin or clip in place with right sides together. Repeat with the other strap to make a “+” across the bottom. Sew with a basting stitch 1/4” from the edge to secure.
Step 9: This step is a little tricky, but if you have ever used the burrito method on a bodice, it may feel familiar. Next, you will attach the bottom of the lining to the bottom of the outer band fabric. Normally, you could easily slide the lining into the outer, but the bottom straps are in the way. So, tightly roll up the top of the lining, leaving the bottom inch or so flat. With your outer band wrong side out and lining right side out, squish the rolled-up lining down as far as the straps will allow, and place the flat bottom edge of the lining right sides together with the outer band. Clip or pin then carefully sew all the way around. You may need to stop and reposition the fabric every few stitches to avoid puckering or accidentally catching the rolled-up liner.
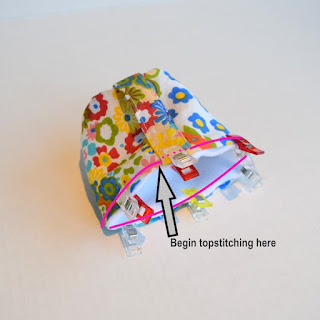
Step 10: Unroll the liner and turn the outer band right side out. Push the lining into the outer, matching up the top edges, which should be folded toward the wrong side from step 7. Topstitch around the top, securing the top of the lining to the outer fabric. If you start your topstitching right next to the handle, then you can sew around and fit the presser foot under the handle at the end of the line of stitching.
Step 11: The cozy is ready to use! I find it easiest to put the pint container upside down on the counter then slide the cozy onto it. Go enjoy some quality time with your friends Ben and Jerry and don’t worry about your delicate fingers getting too cold!
We can't thank Ashley enough for this tutorial! We can't wait to see the Ice Cream Cozies you make. Please share your finished photos in our patterns group on Facebook! We'd love to hear which method you like better and see your cute photos. And of course we're happy to answer any questions you might have.
SEW Inspired,
Emily


