Today we have a special treat for you! You are going to LOVE this free pattern!
Gladiator sandals are all the rage right now, and we know how much your little ones *love* to match their dolls. One of our fabulous testers, Jessica Lang, has put together a doll version of gladiator sandals. And they're not just cute - they're amazing!
See what I mean?! Simply perfect. And the best part is that you can make them too! Jessica is awesome and provided measurements for all three of our standard size dolls: 15", 18", and even the new 14"! Here's Jessica:
Materials Needed:
Foam sheets
Scissors or rotary cutter
Cutting mat if using a rotary cutter
Ruler
Hot glue gun and glue sticks
Ruffled elastic trim
6-8 permafrost bows or other embellishments
Thin cardboard (from a cereal box or comic book board)
Printed pattern piece (click here to download)
Printed pattern piece (click here to download)
Cutting chart:
18" Doll -
Back foam - 1" x 4"
Back cardboard - 1" x 4"
Front foam - 3/8" x 3 3/4"
Elastic #1 - 5 1/4"
Elastic #2 - 5 1/4"
Elastic #3 - 5"
Elastic #4 - 4 1/4"
Foot strap elastic - 2 1/2"
15" Doll -
Back foam - 1" x 3"
Back cardboard - 1" x 3"
Front foam - 3/8" x 2 3/4"
Elastic #1 - 5"
Elastic #2 - 5"
Elastic #3 - 4 1/4"
Foot strap elastic - 2 1/2"
14" Doll -
Back foam - 1" x 3"
Back cardboard - 1" x 3"
Front foam - 1/4" x 2 3/4"
Elastic #1 - 4"
Elastic #2 - 3 1/2"
Elastic #3 - 3"
Foot strap elastic - 2"
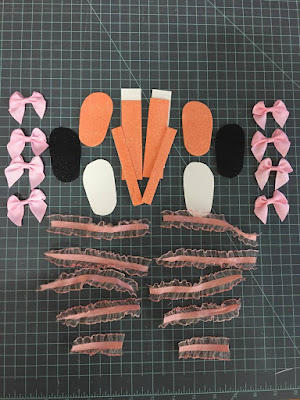
After cutting you should have a pile like this:
Construction:
Step 1: Take Main Sole and glue the foot strap elastic to the wrong side using the guide on the pattern piece. Be careful when using the hot glue, it can come through the elastic and burn you!
Step 2: Glue the cardboard sole to the wrong side of the main sole, sandwiching the elastic ends between them.
Step 3: Glue the bottom sole to the cardboard sole.
Step 4: Take the back cardboard and on the wrong side make a mark 1/2" down from the top edge. Make marks every 1/2" down from the first mark until you have three marks for the 14" and 15" size and four marks for the 18".
Step 5: Starting with Elastic #1 and the top mark, glue one end of the elastic to the center of the back cardboard on the wrong side. Work your way down the marks with the remaining elastic pieces. Elastic #2 should be on the second mark from the top and so on.
Step 6: Bring the other end of the elastic around the front of the back cardboard piece and glue on top of the end already glued down, making sure the elastic is not twisted and that it overlaps the other end by 1/4".
Step 7: Glue the back foam to the wrong side of the back cardboard sandwiching the elastic ends between them.
Step 8: Now we're going to glue the back foam piece to the back of the sole. Line up the center of the back cardboard to the mark on the back foam flush with the bottom soles. You will need to hold this piece in place for a few seconds so it will stay.
Step 9: Now we're going to attach the front foam to the front of the elastic. It can be a little tricky but just be patient and it will work out. Start at the foot strap and find the center of the elastic. Place a small dot of hot glue there and put one end of the front foam on the dot lining it up with the bottom edge of the elastic, not the edge of the ruffle.
Now find the center of elastic #1. Again place a small dot of glue there and place the other end of the front foam there, this time lining up the edge with the upper edge of the ruffle.
Now put small dots of glue on the center of the remaining elastic pieces and push the front foam down onto them, making sure the elastics stay evenly spaced and straight. Your sandal should now look like this.
Step 10: Now we'll attach the bows. On the outer portion of the sandal find the point between the front and back foam pieces. Place a small dot of glue on the back of the bow and place on the center point of the elastic. Repeat for the remaining elastic pieces.
Step 11: Repeat steps 1-10 to create the other sandals and you're done!
Thank you so much to Jessica for sharing this pattern with us! They look super fun to make in addition to how adorable they end up. A real winning project!
Now it's your turn to go make some. When you're done, please come share in our patterns group on Facebook -- we would love to see!
Let's Create! ~ Kristen


