
One of my favorite things to create is holiday decorations. They add a little festive flair to the house and the kids get excited for upcoming fun. A few weeks ago we showed you how to make super cute flag pillows, and now today we're going to add a little more 4th of July decor to your collection! Of course the tutorial can be used for any holiday but right now just happens to be prime time for a little red, white, and blue.

As much as I love love love to sew, sometimes it can be fun to have a quick project that uses few supplies and can be put together quickly. I decided to make this project a no-sew one, but it still has fabric and sewing written all over it. I was SO excited to hang it on my front door! Let's get started!

All you will need for this project is an 18" craft wreath (any kind), straight pins (with flat heads), scissors, and 1.5 yards fabric. If you want to use three different fabrics like I did, you will use half yard of each. That amount includes the bow too. Or, if you want to use up scraps from your stash to make your wreath, that's totally doable too!

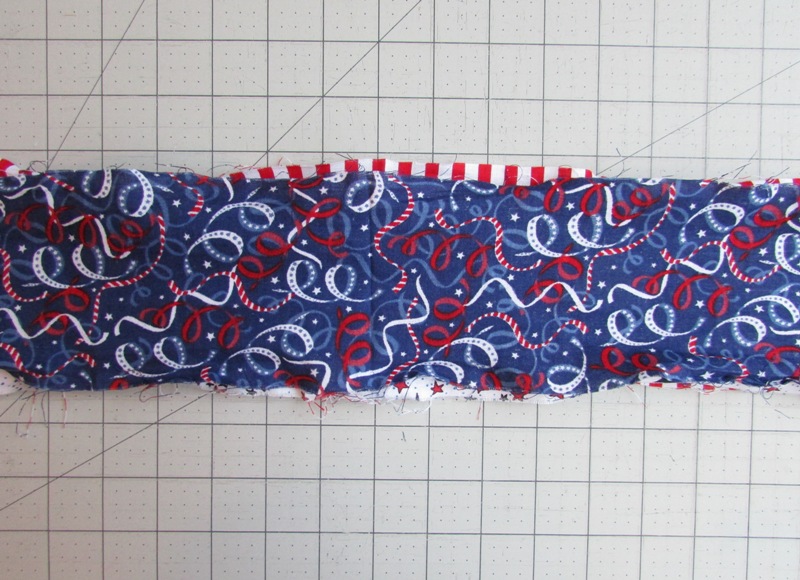
First, cut the fabric into strips that are 4" tall x the width of the fabric. If you're using three fabrics, you should end up with 4 long strips of each fabric, or 12 total. Cut off the selvages.

Now you will "rough up" or distress the edges of all your strips. This can be done several ways. The easiest is to run them through a quick cycle in the washer and dryer. Or, a quicker but more involved way is to distress the edges using the edge of a desk. You simply hold the edge of the fabric against the corner of the desk and run it back and forth along the edge. You could also "scrape" the edges using scissors or even just your hands. Here's a little video if you want to see:
You can distress the edges as much or little as you want. I think the wreath turns out really cute the more you tear up the edges -- it adds a lot of texture.
If you decide to use the washer/dryer method, you don't need to do anything to the strips before putting them in. I use a short cycle for both because they don't really need "cleaned".

Don't be alarmed if the strips are all tangled and stringy when you pull them out of the dryer. This is what mine looked like. Just take a minute to untangle them, clip any really long threads (but leave the shorter ones -- it's part of the shabby look) and slightly flatten them out. You definitely don't need to iron the strips.
When you have all your strips distressed, set aside 3 of the strips (one of each) to be used later in constructing the bow. This will leave 9 strips to be used on the wreath itself.

Take your first strip of fabric and pin it to the inside of the wreath with a couple flat head pins. (This works great for straw and styrofoam wreaths. If you're using a different kind of wreath such as a grapevine, you can still use the fabric strips but you will probably want to use hot glue in place of the pins.)

Wrap the fabric under and around and back through, keeping the strip somewhat flat with the right side of the fabric showing.

After a couple wraps, take the strip and twist it on itself loosely to create more texture as you do the next wrap on itself. (See photo above.) You don't want to leave any gaps showing through though, so keep the wraps overlapping slightly.

When you get to the end of that fabric strip, pin it in place with one pin.
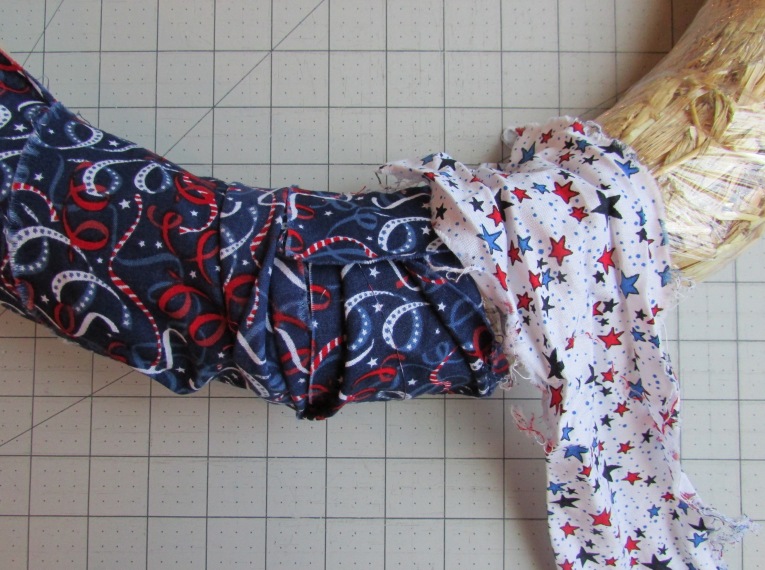
Take a different fabric strip and start it just as you did before, being sure to overlap the first fabric so there are no gaps. You will wrap this one just as you did the first by making two regular wraps and then a twisted wrap.

When you get to the end, start with your third fabric. The ends can share pins when you get comfortable doing so.

Continue adding strips to the wreath, alternating as you go. You can try to pace yourself so you end up with your 9 strips spaced equally around the wreath, but don't stress too much over them coming out exact.

When you get to the end of the last strip, make it overlap onto the first strip and pin it in place.

Check to make sure you don't have any gaps showing through on the front or back. It should be fairly easy to adjust the fabric back and forth. When you're done wrapping your wreath it should look like this. Pretty cute!
Now you're ready to make the bow.

Take your three remaining strips and lay them out on a flat surface. (If you accidentally used them on your wreath, go ahead and make some more.)
Stack the three strips on top of each other, with your favorite one on top.

On the right half of the strips, grab all three strips at once and hold them as a loop, as shown above.

Take the ends on the left and wrap them around your loop, come back around and up through, creating another loop as shown above.

Pull the two loops until they are even on top and bottom. If it didn't come out somewhat evenly, untie and try again. If you have a better method for tying a bow, that is totally fine too! Be sure to have your layers stacked on each other until this point.

When you're happy with your bow, go ahead and spread out the layers on the loops and the tails, as shown above. Don't be afraid to pull here and there until you like how it looks. It's better to have a fun, textured bow for this project than a perfectly even and flat one.


Now you can decide whether you want to attach your bow at the top or bottom of the wreath. Both styles are really cute; it just depends what you want! When you get the placement you want, use several pins to attach the bottom-most layers to the wreath. I put a pin in each of the bottom loops and bottom tails. The more spread out the pins are on the underside of the bow, the more stable it will be.
Now you can add any kind of hanging-loop to the back of your wreath if you want. Simply secure it in place with more pins or glue. I actually hang my wreath directly on a long nail so it doesn't need a back loop for hanging.

That's all there is to it! Your shabby chic fabric wreath is done. I hope you LOVE yours as much as I adore mine!

Now you're ready to show it off on your door, wall, shelf, chair, or anywhere else you want to put it!
If you have any questions or comments about this free project or any others, we would love to hear from you in our patterns group or by email at createkidscouture@gmail.com! You can also check out our clothing sewing patterns here.
Let's Create! ~ Kristen