
As much as my boys love rough and tumble play, I'm still a sucker for a clean-cut kiddo, all dressed up for church and holidays. William's, Emmett's, and Patrick's are my staple patterns and sometimes it's fun to mix them up a bit! This week my youngest kiddo was genuinely ecstatic when I told him I was going to add a pocket to his new vest. Maybe he was expecting candy in it too? I dunno, but as happy as he was, I thought your boy might like the idea too. So how about a tutorial?

In case you're wondering, a "pocket square" is the fancy name for that little handkerchief that you might have seen folded up in the front pocket of suits and vests. There are countless ways to fold a pocket square "properly" and I'll show you my favorite when we get to that point. But first, the pocket!
There are actually lots of different types of pockets you can add to a vest too. Here's an example that one of our fans, Tisha Bottoms, made:

Isn't he adorable?! She did an awesome job on his entire set!
If you want to add that style of pocket to your vest using today's tutorial, you can click here for a blog post that will give you that pocket shape. Then continue on with the instructions below.
Another popular type of vest pocket is a "welt pocket". For that style of pocket, you can look at the back pockets from our Patrick's or Tanner's patterns and copy over the technique to your vest, either on the left breast or down for lower pockets on each side.
The method I'm going to show you today, however, is a simple rectangle pocket. It's a great one to learn with and I love the look. But keep in mind that you can mix it up any way you want; this tutorial is just a starting point for all the customizing you want to do for your kiddo's clothes. Let's get started!

First of all, you will need to print the pieces of the vest from William's Formal Accessory Set. (It comes in Toddler and Tween sizes, and includes suspenders and cummerbund, but for today we're only using the vest.)
With your vest pieces printed, go ahead and cut out the fabric as instructed in the pattern. I used blue with dots for the main fabric and white for the lining.

Then cut out a rectangle that is about 6.5" long and 4" wide. This will be your pocket piece.
(I made a size 5T. Your pocket can be bigger or smaller, as long as it keeps roughly the same proportions.)

Fold the pocket piece down in half with right sides together. With the fold at the top, sew around the three remaining edges using a 3/8" seam allowance, leaving a 2" opening at the bottom.

Clip the corners close to the stitching. Then use the opening to turn the pocket right side out. Use a creaser tool and iron to make the edges and corners nice and crisp.

With the fold at the top of the pocket, measure down about 3/4" from the folded edge and sew straight across the pocket. This is mostly a decorative stitch but it also helps the pocket lay flat.

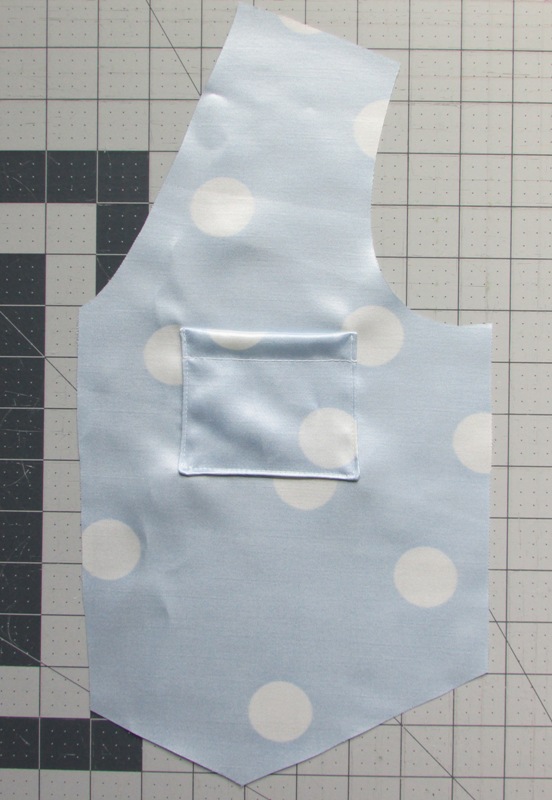
Take the front vest piece of the main fabric that looks like the photo above. (This will be the right side of the vest as we look at it, or the left side of the person wearing it.) Lay the vest piece on a flat surface and place the pocket on top of it, both with right sides facing up.
Place the top of the pocket at about the level of the armhole, and center it between the armhole edge and the opposite slant of the vest. Keep in mind that there will be seam allowances on both sides, so you want to leave plenty of room. See photo above.
Pin the pocket in place on the three lower edges of the pocket. If you're using delicate fabric like mine, be sure to pin close to the edges where the stitching will be. Check to make sure the pocket is facing the right direction, with the stitch line on the top.
Topstitch the pocket onto the vest by sewing along the three lower sides of the pocket, about 1/8" from the edges. Be sure to backstitch at the beginning and end of your stitching, to keep the pocket secure.
Your pocket is now attached!

Now you can follow the rest of the construction steps for the vest pattern! I just love how mine turned out. Notice that after you sew all the seams, your pocket will end up higher than the armholes. This is perfect for a breast pocket -- and there's still plenty of room for a pocket square too!
Speaking of which...

If you want to make a pocket square, start by choosing what size you want to make and cutting an exact square out of your fabric. A standard pocket square is usually between 10" and 18" for an adult, so it could be much less for a child. I decided to do mine right at 10", so if you want to fold yours like I did, you may want to do close to that amount.
With your pocket square cut, you have a few options on how to finish the edges. You can make a rolled hem on a serger or a sewing machine -- this is probably the easiest. Or you can make a narrow folded hem on a sewing machine, simply overlapping the hems on the corners. Or, if you want to go all official as a pocket square, you can make a narrow rolled hem with neatly mitered corners. If you have not made mitered corners before and want to learn, it's not difficult and we have a very thorough blog post that covers it. Go ahead and click here for that blog post to read up on it, and then come right back. We'll wait for you.
Okay, did you get it? I'm sure however you decided to hem the edges of your pocket square is fabulous. Now you can fold it however you want and stuff it in that cute little vest pocket, or you can continue on to see how I folded mine. Here goes:

Lay the pocket square out flat with its wrong side facing up, and its points going up and down and side to side. (I suppose right now it is more of a pocket diamond?)
Fold the left corner in so it reaches about halfway to the center. See photo above.

Then fold it again, so it goes a little past the center. See photo above. (The photo may look like it is rolled, but it is actually two folds.)
If you're a perfectionist, hold your breath for a bit, because we are making it slightly off center on purpose!

Now take the right point and fold it in to meet the previous folds.
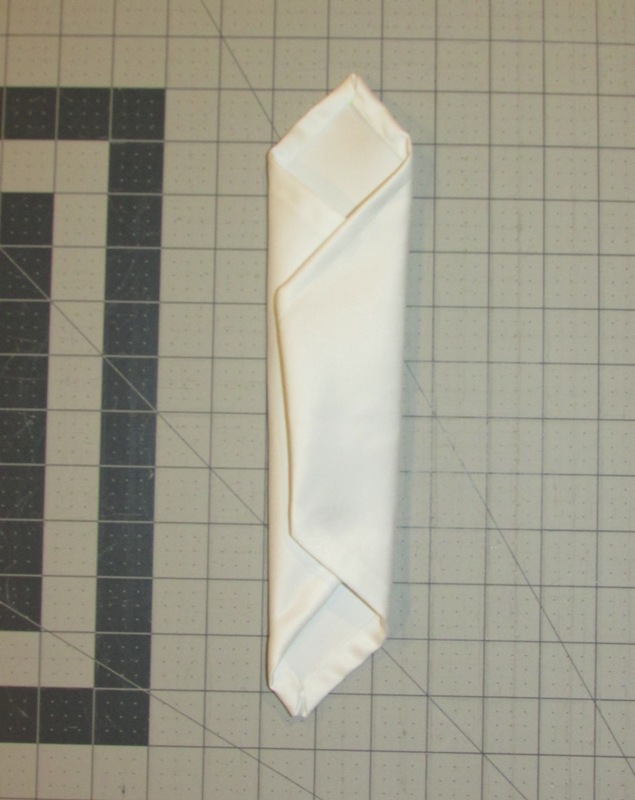
Then fold again so it sandwiches over the top of the others.

Take the bottom point and fold it upward, with its point now landing about even with the other top creases. See photo above.

Fold the bottom up again to where it creates a square/rectangle below the points. It's a pretty snugly folded "square" at this point.

This is what it should look like on the right side now.

Just slip that little guy down in the pocket on your vest! If it's not a perfect fit, you can go back and adjust some of the folds. Or you can ditch my method altogether and fold it however you want. Pocket squares can be folded as squares, rectangles, triangles, double triangles, or even rolled or bunched, or... you get the idea. I do like keeping most of the bulk/weight toward the bottom of the pocket so it won't fall out easily. My kiddo's didn't budge at all. Oh, speaking of that kiddo.

He loves his new vest, complete with pocket and pocket square!
Oh, one more thing! If you have a vest that is already constructed, it is totally fine to add a pocket at the end too! I like to add the pocket at the beginning of construction when possible, so the stitch lines will be hidden between the layers, especially since William's is reversible. But if you're past that point and want to add a pocket anyway, go for it! It's a quick addition that adds a lot of charm.
Now it's your turn to have some fun! Please share with us when you're done, by posting your creations in our CKC Patterns group and/or our CKC BOYS group!
Let's Create! ~ Kristen
