Occasionally someone posts something incredible in our Patterns Group that everyone goes wild over, including myself, and we can't help but ask them to share their creativity with us. Such is the case with Abbey Button and her Batman Blanket!
How cool is this kid?! I know five kiddos at my house who would LOVE to have a Batman blanket! And you can't tell from the photo, but his arms are even spread out into the wings. Amazing! Abbey used one of our free patterns as the base for the blanket and she has been kind enough to tell us how she made it. Awesome!
First, you will start out by downloading our FREE Shark/Mermaid Tail Blanket pattern here. Print, tape, and cut out the two main tail pieces for the body of the bat. Do not sew yet.
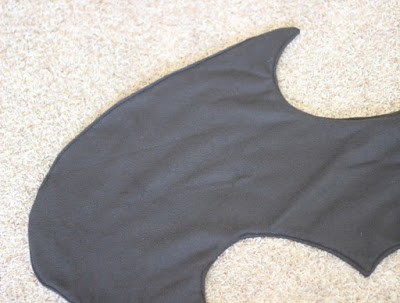
Next, you need to print out and tape your bat wings. We have a small-size image for you to download, but you need to open it up and print it enlarged to Poster format, set at 4x4. This will give you 16 pages that you will tape together to make the piece above. Or, if you can't get your printer to do the poster format, you can freehand the wing shape using the photo above. Please note that this is for a toddler-sized blanket so you may want to make the wings template bigger or smaller, depending on the size of blanket you're making. Also, she ended up cutting off a little more of the bat body in the photo above, so it was cut off closer to the line of the ear. You can do it wherever you'd like.
Use the pattern piece to cut out four wing pieces from your black fleece. Two of them should be mirrored.
Place two of the wing pieces with right sides together and pin around all the wing curves, leaving the flat edge open that will connect to the bat body. Sew along the pinned edges. Then take the other two wing pieces and do the same. Clip the curves and turn the wings right side out.
Top stitch the edges of the wings 1/4" from the edges so they will lay flat.
Take one of the big body pieces you cut out at the beginning and lay it on a flat surface with its right side up. Place one of the bat wings on top of it with its flat edge at the left side of the bat body, near the top. Pin the wing in place along the edges. Take the second wing and place its flat edge on the right side of the bat body, near the top, and pin in place. The wings should be overlapping each other within the shape of the body. Take the final body piece and lay it on top of the others, with right side facing down. (The two body pieces are now right sides together, with the wings sandwiched between them. Fold all parts of the wings inside and pin the two body pieces together along the sides and bottom, leaving the top open.
Sew along the pinned edges using 3/8" seam allowance, but be sure to leave an opening for the arms near the top! See the space in the red lines above. You will sew down a bit from the top, leave a space, and then sew around the body up to the other side, leaving an equal space on the second side for the other arm. Be sure to backstitch at the beginning and end of each sewing section.
Now where you left the two openings for the arms, go back and sew the top two layers together and the bottom two layers together, as shown in the photo above. This will seal off the sides while creating finished arm holes.
Turn the blanket right side out. Your wings should now be attached as shown above. Top stitch around the body edges, being sure not to to close the armholes.
Finish off the top of the blanket by hemming the edge and adding triangle ears if you want. You can also use yellow and black fleece to add the symbol. You can download that here and resize as you want when you print. Cut out the shapes and topstitch them in place, being sure to go through only the top layer.
That's it! Now you just add the child. A very, very happy child.
Thanks so much to Abbey Button for sharing her creativity with us! Both of us can't wait to see your Batman inspired blankets.
Let's Create! ~ Kristen


