It's the Fourth Day of Christmas at CKC, and today Elizabeth is teaching us how to make one of her favorite accessories!
Aren't they gorgeous? I love the dainty little details as well as the added bling. These are sure to pair beautifully with all our mommy made creations!
Materials Needed :
Glue Gun and glue sticks
1/8 “ or 1/4 “ ribbon
Lighter
Small Resins , Bows or Flowers (girls)
Scissors
Cutting
the Ribbon
Measure your
child’s wrist. You will then Cut 2
strands of ribbon, each one 4 times the number you got for your child’s wrist and then
add 4. If you are making the single Ribbon bracelet
you will cut only ONE strand, but you will double your final number.
*Example: If
your child’s wrist is 6.25”, your ribbon would be about 29” in length. You would
cut 2 strands from the ribbon of your choice.
Or, if you were using just one color you would cut ONE 58” long strand.
Making the
Braided Bracelets
If making the single ribbon bracelet, continue below using steps a-c. If doing
the double ribbon bracelet you will skip straight to Step 1.
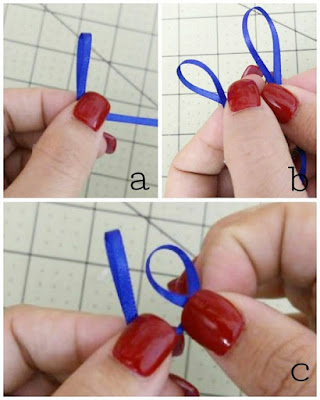
a. Take
your ribbon and fold it so that it’s longer on one side. ( This would be the
side where you formed your first loop as shown in the photo.)
b. With
the other side of the ribbon, you will now form a second loop
c. Once
you have both loops, take the loop in your left hand and bring it in towards
the inside of the opposite loop.
Skip to
Step 5 Below.
Step 1.
Cut your 2 strands for the size you are making.
Step 2.
Take your strands and tie them in a knot. (Once you have tied them in the
knot, using your
lighter, light it and quickly run it across the starting ends of each strand.
This will seal the ends of your ribbon from unraveling).
Step3. Form 2
loops as shown in the photo.
Step 4. You will now take one of your loops and bring
it in towards the inside of the opposite loop. Once the loop is inside, you
will pull down on the ribbon closest to you to form a braid/knot.
Step 5.
Continue alternating the loops by putting the loop inside of the opposite color
and pulling the ribbon down to form the braid/knot.
Steps 6 - 8
these photos shows the blue loop going into the white loop. Once the blue loop
is inside the white loop, you will pull the white ribbon (step 8) to form the
braid. Continue to do this (alternating
your colors) until you have about 1.5” remaining at the end of your ribbon.
Step 9. Your
bracelet is almost complete and should look like the photo shown.
Once you have
followed all of the steps above, you should now be able to complete your
bracelet
Step 10. Tie
the ends into a knot so that it doesn’t become unraveled.
Step 11. Trim
the ends and use your lighter to heat seal the ends.
Step 12. Put
a dab of hot glue on each end of the ribbons and you are going to fold them in
towards the inside of the ribbon as shown in the photo.
Step 13. You
are now going to glue the ends together by placing one end on top of the other.
Step 14. Your
Bracelet should now look like this photo.
If you are making a boy’s bracelet you are now Finished. If you are making a girls version continue
on to step 15.
Step 15. You
will now be adding your flower, charm or anything you’d like to decorate your
bracelet.
Step 16. You will be adding the flower to the top of
the bracelet where you connected the two ends on top of one another. This will hide where you connected them,
making your bracelet look flawless.
You are now done with your Braided Bracelet! How fun was that?! Friendship bracelets are great for girl’s camp, sleepovers, or to show your school spirit. They can be made in a wide variety of color combos and with different embellishments and such. It is a cheap and easy and fun activity for your child to do on their own or with friends as Christmas gifts. ~ Elizabeth
Thanks to Elizabeth for this super fun tutorial! I can't wait to try it out -- I'm sure my daughter will insist that I teach her too.
We hope you are enjoying all of our Twelve Days of Christmas freebies so far. Stay tuned for another one tomorrow, and don't forget to share this with your friends!
Let's Create! ~ Kristen


