
In the previous episode of our Sewing 101 series, we showed which Supplies You Really Need to get started. Now that you have all that ready to go, today you're going to learn how to thread your sewing machine! It's not difficult at all but with a few pointers you should be able to pick it up quickly and get on to what you really want to be doing -- sewing! So let's jump right in.

First of all, put your spool of thread onto the holder. Yours may look different depending on your machine. Slide it on all the way, and add a stopper to hold it in place if your machine requires it. Check to make sure that the thread pulls off smoothly. This is our top thread. Now let's take a look at the bottom thread, or bobbin:

This is what the bobbin looks like, although yours might be made of metal or a different type of plastic. Some bobbins drop in through the top like this one, and some bobbins are front-loading. If you aren't sure which you have, you may need to look in your manual for extra help. But whichever type you have, you will need to put thread on it, and that process is the same for both. Right now you can see that my bobbin is empty, so in the next few steps we are going to wind thread onto it using our top spool.

To begin, pull some thread out from the top spool and wrap it around the screw to the left, as shown by the guide on your machine. Some models have you wrap it once while others do a figure 8. Wrap the thread as directed on your machine and then pull it to the far right, where you will find the bobbin winder (on most models.)

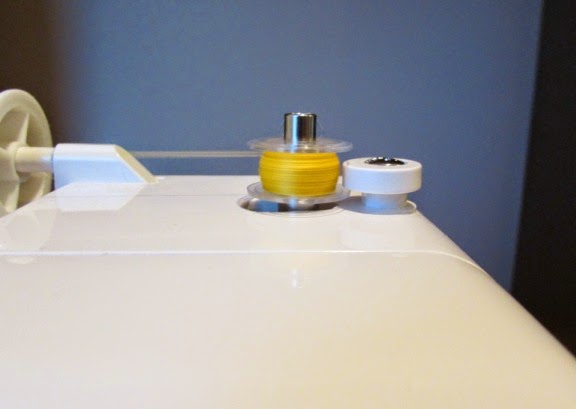
Insert the end of the thread up through a hole on the top surface of the bobbin. Then slide the bobbin onto the post until it latches in place. Slide it to the right to engage it. It should now look like the photo above, with the thread still going through the small hole.

Pull the thread upward so it is taut and then begin to "drive" with your foot pedal. The bobbin should spin quickly, wrapping the thread around it. Continue for just a few seconds.

Once the thread has wrapped just enough to be secure, clip it where it comes out through the hole on top.
Then continue "driving" as the bobbin fills up with thread.

Most machines have a stopper, such as the white plastic one above, that will stop the bobbin from spinning once it has filled up to a certain amount. Keep an eye on it so you can stop your foot pedal once it gets full and the bobbin stops spinning.
Now you can cut the connecting thread and remove the bobbin!

Take the bobbin back down to where it needs inserted (whether it's the top like mine or the front like other models) and thread it according to your manual's instructions. You can see on the clear plate of mine above that there is a drawing showing how to wrap my thread. Machine manufacturers want to make this process easy on us and most new machines have illustrations where they are easy to see.
Once your bobbin is in place with the thread going toward the back, you are ready to go back to the top thread.

Back on top of the machine, we are ready to thread our top thread. Again, there are usually numbers or arrows to help with this process. You generally begin by going behind a post, as shown above.

Then the thread pulls downward through the machine...

And back upward again, just as the arrows show us.

At the top, the thread will again wrap around a post, and this time it is a moving part (one that goes up and down as you sew) so if you cannot see it at first, you may need to twist the hand knob toward you until it appears. See the photo above.

Next, pull the thread downward again, as indicated by arrows. Although there is some variation in sewing machines, they do all seem to follow this general down-up-down movement.

With the thread down by the foot, many machines have a little notch at the top of the presser foot that you can slide your thread into for extra stability. If your machine doesn't have this notch, don't worry about it. Mine does but my daughter's does not.

Now it's time to thread the needle! Slide the thread into the needle hole from front to back. Some machines have a built in threader but I usually like to do it by hand.

Now that both of your threads are in place, pull them both toward the back of your machine and you are ready to get sewing! You are all threaded!
Please join us for the next episode in our Sewing 101 Series! You can find it here:
Let's Create! ~ Kristen