
I love to personalize the clothes I make for my kids, and my kids seem to like it even more! My new favorite way to do this is with iron-on vinyl. There are many different types out there and you just want to make sure you choose one that is intended for ironing onto fabric. You can either cut the shapes out by hand the old fashioned way, or you can use a cutting machine such as a Cricut, Cameo, Silhouette, etc. Today I'm going to show you how it's done!

Yes, my daughter is the lucky recipient on this project. I'm so in love with how it turned out!

I chose to use Cricut brand Glitter Iron-On Vinyl for this project. Basically, it is a sheet of clear backing with a layer of red glittery vinyl stuck to it. So there are two layers total: one will be ironed onto the shirt permanently and the other will be peeled off after ironing.

I cut off the amount of the roll that I needed and laid it sparkly side down on my Cricut cutting mat. The vinyl instructions told me which settings to use for depth, pressure, and speed, so it was pretty smooth sailing for me. (All medium settings for my particular model. Yours may be different.)
IMPORTANT: If you are cutting out letters/words like I did, you must FLIP the image you type in so it is mirrored. If you don't flip it, your letters will all be backwards from the sparkly side. On my machine I also typed the name in backwards (elociN) so I could leave the letters in place on the backing. I'm pretty sure newer models have a mirror feature that doesn't require you to do that. It's a good idea to practice on cardstock before cutting into your vinyl, just to be sure!
It's also a good idea to use up all the space on the cutting mat because after you peel or "weed" it off, you won't be able to go back and cut more shapes out of the remaining vinyl very easily. It's possible but kind of a pain. I went ahead and cut the hearts I wanted for the shirt, plus I made a second set of everything to put on another project. It will probably end up on her dance bag or a pillow.
I also recommend starting with a fresh blade and cutting mat for your machine -- mostly just because that's just how I do things. I don't want to ruin a whole sheet of vinyl because of a dull blade.
Okay, now you're ready to cut out your shapes! Go for it!
(If anyone wants to know, I used the Cricut cartridges "Opposites Attract" and "Doodlecharms" to cut these.)

After cutting out the shapes/words you want, carefully peel back the sparkly vinyl and pull it away from the backing that is still stuck to the cutting mat. Yay! Looks good so far.

Continue pulling back carefully, "weeding" out the negative space from the backing. This is not difficult at all, but you do want to go slowly and pay attention to the small pieces so you don't stretch or tear the letters/shapes.
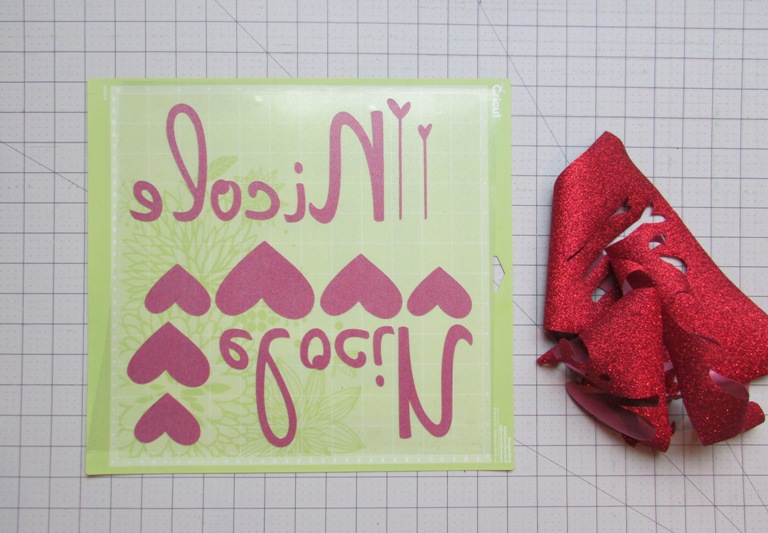
When you're done, it should look something like this! Woo!
See how the leftover vinyl sheet is kind of a rolled up mess? That's why I like to cut all at once. You can technically save these pieces to cut out small shapes by hand. They will still work, just not as easily.
Again, for people who don't have a cutting machine, you can definitely cut all your shapes by hand with scissors -- it is just a little more tricky to get the backing peeled off after ironing.

I cut out the backing of the first portion I wanted to iron on to my shirt. All my letters are able to stay together in one piece on the backing.

Then I laid them out on the shirt, just to make sure I had in my mind what I wanted it to look like. Note: The backside of the backing is a little sticky but don't stick them on firmly quite yet. This is just for placement.
For the main name piece I used pins to "point" to the corners of the backing so I would get it back in place exactly where I want it. You'll see why in a minute.

Plug in your iron and have an ironing cloth ready. This can be any clean, iron-safe cloth that you will use between the iron and the vinyl. I prefer 100% cotton so I don't get the fumes. (Ironing polyester gives me a mega headache.)
To iron on your vinyl, you need to read the instructions that come with your particular vinyl. They are all pretty similar, but you don't want to take the chance of overheating (melting it, ew) or underheating (it will peel later). For my vinyl, I was instructed to heat the cloth for 15 seconds on cotton setting, then lay the vinyl on, and then use a pressing cloth to iron another 15-20 seconds. I'll show that in a minute.
But first we MUST test out a little piece of the vinyl on a scrap of fabric! Use the exact fabric if possible, or at least one that is very similar. The photo above is proof that I tested mine out. I usually don't test things, ssshhh, but this is an important time to be a good girl! It passed the test by ironing on securely without melting, whew.

Moving back to the shirt, I took off the vinyl and used the iron to heat the fabric for 15 seconds.

Then I laid the vinyl/backing on the hot fabric, with sparkle side up. Notice that I matched up the corners of the backing with the points of my pins, so I was sure about my placement. Press down on the backing so it lightly sticks to the fabric. Remove the marking pins so you don't melt them!

Cover the whole area with the pressing cloth and iron over the letters, being sure to glide smoothly over all the area that needs to stick. I did it for 15-20 seconds as instructed.

Peel the backing off the shirt. The letters should be stuck to the shirt so it comes off easily. Glorious sparkles! (This photo doesn't do it justice.)
If you don't have a cutting machine and used scissors to cut shapes, this is the step where you will have a slightly harder time. You have to peel the backing off each shape individually. It's doable though! You may want to stick with big shapes your first time.

If you have more than one section of vinyl to use, go back and add your remaining shapes now, following the same steps above for each one.
Note: You can get really fun effects by layering different colors and cuts of vinyl over each other! Just do it one layer at a time as instructed above. It is important to know, though, that if you're using glitter vinyl, it can only go on the TOP layer when ironing on. You don't want to iron anything on top of the glitter vinyl.

And here's my finished shirt! My cutie Miss Nicole LOVES it. One final note is that your outfit is laundry-safe and should last a long time, but it's a good idea to turn it inside out and don't let it get too hot in the dryer.

Now you're all ready to go out and make your own custom creations using iron-on vinyl! It is super fun to do and the results are eye-catching.
Let's Create! ~ Kristen