Hi. It's Cynthia! A few weeks ago CKC released the beautiful Vera’s. I fell in love
the moment I saw it and couldn’t wait to get my hands on some chiffon. My
modified top was so well-received in the group that Kristi asked me to make a
blog post, and of course I’m super honored and thrilled to do so. So here
goes!
My “casual” Vera’s modification has smaller chiffon pieces that
hit at the thigh and there is also less chiffon on the top of the blouse. I
hope you find this little tutorial to be a super easy twist on this amazing
top.
Materials:
All supplies listed in the pattern
Paper to make a pattern piece
Pencil
Ruler
Scissors
Step 1 - Choose your version.
I made two tops and used different sizes for the chiffon so you
can choose the one you prefer. I will show each version below:
Red Flowers Version- I used a smaller rectangle shape for the chiffon.
To wear it you simply fold the edge of the chiffon under, when crossing it over
your body. This creates a very slim and smooth look across the bust. You do
need to make sure and wear a supportive belt, though, to hold the chiffon in
place. My black belt has a nice wide elastic in the back. Because the chiffon
is much shorter than the pattern, it might still shift a tad if you were to
head out for a night of vigorous dancing at the club. Just glance in the mirror
every once in a while and you’ll be golden!
Pink with Owls Version- I cut the top line of the chiffon pieces wider
so that there’s more chiffon reaching across the body and down toward the belt.
This will create a fuller look across your front, which may be nice if you want
to enhance your bust. The bottom cut line is the same, though, so it still hits
at the thigh.
Step 2 - Create your Pattern Piece
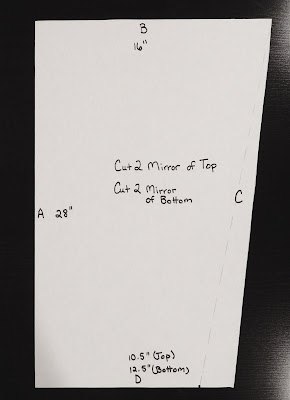
Cut out your pattern pieces and/or chiffon using these guides:
Red Flowers (Smaller Chiffon) Pattern Piece
28” X 10.5” (cut 2) Top chiffon pieces.
28” X 12.5” (cut 2) Bottom chiffon pieces.
Pink with owls Pattern Piece
Cut 2 Mirror of Top
Cut 2 Mirror of Bottom
Step 3 - Roll Hem the chiffon.
Follow the pattern instructions for doing rolled hems. Note that
Side A is the side that does not get hemmed.
Step 4 - Follow the Pattern to create the shell and lining.
When attaching the chiffon, make sure the pieces are placed
correctly.
Step 5 - Finish according to the pattern and enjoy wearing your
new “Casual” Vera’s!
~ Cynthia Hendrickson


No comments:
Post a Comment