

Adding embellishments to an outfit is one of my favorite parts of creating. Even when I'm using my own patterns, I like to personalize each item here and there by adding details. We've had a lot of interest in our patterns group lately on how to to add embellishments, and I am super excited about our guest blog post for today! Merav Ruthman, from Baby Hobbes Design, is here to show us how she put her own embellishment ideas into our new Melody's Dress. It turned out gorgeous, don't you think?
Here's Merav:
I am so excited to be guest blogging at CKC, especially since a year ago I would not have imagined I would be testing new patterns and altering them too. Mind that, I still consider myself a beginner (well, maybe an advance beginner) because while testing the Melody's dress, I installed my very first zipper.


It turned out great! While zipper shopping for my first Melody's, I came across these 'exposed' lacy zippers:

They got me thinking: How great would the Melody look with the zipper being incorporated into the design rather then hidden? Also, how neat would it look to add lace to the sleeves and hem, to match the zipper? So I had to try it!

Today I am going to show you, step by step, how to add these fun lacy details to your Melody's pattern. And as a bonus, I will also include how I achieved the bigger bow look too. Happy Sewing!

Shopping List:
(in addition to the requirements listed in the Melody's pattern)
Lace: Add the width of the skirt pieces + the width of the two sleeve pieces (flat side), then add 3".
Sash: Double up on the amount listed in the pattern's fabric requirements.
Exposed Zipper: If you can't find one at your local craft store, Megan Myer over at Sew it Seams sells these lovelies:


To start out, you will cut out your pattern pieces per Melody's pattern instructions, EXCEPT your side sash tie pieces if you are making the big bow.
To achieve the big bow look, I doubled up my measurements on the side sash ties, then folded each in half on the long side and cut one of each of the edge pieces on an angle to achieve the look. See the photo below.

With your fabric cut, you are now ready to begin construction!
Adding Lace to Sleeves
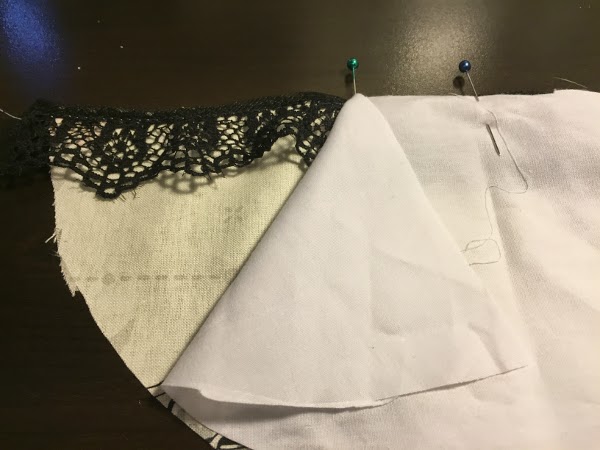
Take one of your outer sleeve piece and lay it right side up. Cut out a piece of lace, long enough to hang over each edge by 0.5". Place the right side of the lace facing down the right side of the sleeve and pin the edges together like this:

Repeat with the other sleeve.

Take your pinned sleeve piece and baste stitch the lace to the sleeve 3/8" from the edge. Repeat with the second sleeve.

Take your sleeve lining and lay it over your outer sleeve, with right sides together, so the lace is sandwiched in.
Now sew your sleeve lining to your outer sleeve, as instructed in the Melody's pattern in Step 2. Repeat and then top stitch.

Continue following the Melody's directions and attach your sleeves to your bodice.
Attaching the Double-Sized Sash

Since my double-sized sash is now double the size of my front sash, after sewing it together and top stitching it as directed in Melody's step 9, I pleated the raw edge of the sash in, like an accordion, to fit the size of the front sash.

To do this, fold it in half, then fold each half in half. Then take the two end quarters and push them next to each other while flaring the two middle above. Pin and sew like the picture above.
Then continue to follow Melody's instructions from Step 10 until the zipper in Step 19.
Attaching an Exposed Zipper
Follow Step 19 in Melody's pattern.Once you decide on your zipper placement, go ahead and flip over the tail ends of the zipper and sew it closed.

(In this version of the Melody, I didn't add the lining/underskirt because I choose to add lace to the main skirt fabric instead. If yours does have an underskirt, these next steps will apply with both skirts.)
(Optional) You can choose to baste down the the seam allowance in Step 20. Remember that with an exposed zipper, your seam allowance will not be hidden in the zipper.

Notice in my picture, I also added pins to the dress on each side of the zipper. I decided to catch the extra bulk in the dress fabric that may get caught in the zipper instillation.
Now flip the dress right side out, and lay the back side facing you. Take your zipper and lay it on top of your dress, securing it with pins along the way. Just as we did with the original Melody's, go ahead and tuck the top tails under like in Step 21.

Once your zipper is secured, gently look at the inside of the dress to make sure that the zipper is following the direction of the basted line and that no extra dress material was caught. Using a zipper foot, sew down your zipper on both sides and across on the bottom.

When you are done sewing your exposed zipper on the outside of your dress, it should look like this:

Follow Step 22 in your Melody pattern, and removing the basting stitches from the wrong side of the dress.
Adding a Lace Hem
Just like in Step 23 in your Melody's pattern, you are now going to fold in a hem to the bottom of your skirt. To do this, you are going to fold back the bottom edge ½ inch over to the wrong side. Do not sew yet.
Making sure you have the correct amount of lace (I like to over by ½ inch on each end), find the center back of your top skirt and mark it with a pin. Take your lace edge and place it on top of your dress, beginning at the pin mark, with the right sides together-just as we did earlier when we added it to the sleeves. Making sure you leave ½ inch of lace to hanging, start pining the lace all the way around the dress. Go all the way around and pin till you come back to where you started.
Take your two .5 inch end pieces that are overhanging, pin them together. Once pinned, go ahead and stitch them together. Once they are stitched, open up the seams and pin them along with your lace.
Once your lace is pinned right sides together, go ahead and stitch (permanently) the two layers together, all the way around using a 3/8 seam allowance just like you did with the sleeves.
Flip down the lace and smooth the hem down with an iron. Remember to use the correct heat setting on your lace so it doesn't melt!

Lastly, top stitch your hem 1/8 inch above the lace, catching the seam allowance.
Now you are DONE!!!

Wasn't that fun?! A huge thank you to Merav for putting all of this together and sharing her creativity with us! I think you'll agree that her daughter's dress turned out absolutely perfect. You can go show Merav some love on her page at Baby Hobbes Design!
After today's tutorial, you should have the confidence to add lacy embellishments to your own creations! Don't be afraid to branch out, and please share your photos in our patterns group so we can see too!
Let's Create! ~ Kristen