
You may have noticed that we are in love with fringe styles around here! Just type "fringe" into our search box and you'll see what I mean! Well, today we have another fabulous fringe tutorial for you, and it's also perfect for showing off your favorite phrases or cut files. Take a look!

Isn't it fabulous? Tosha's little girl is stylin'! She used our Leslie's tank pattern and turned it into a layered fringe tank with just a few extra steps!
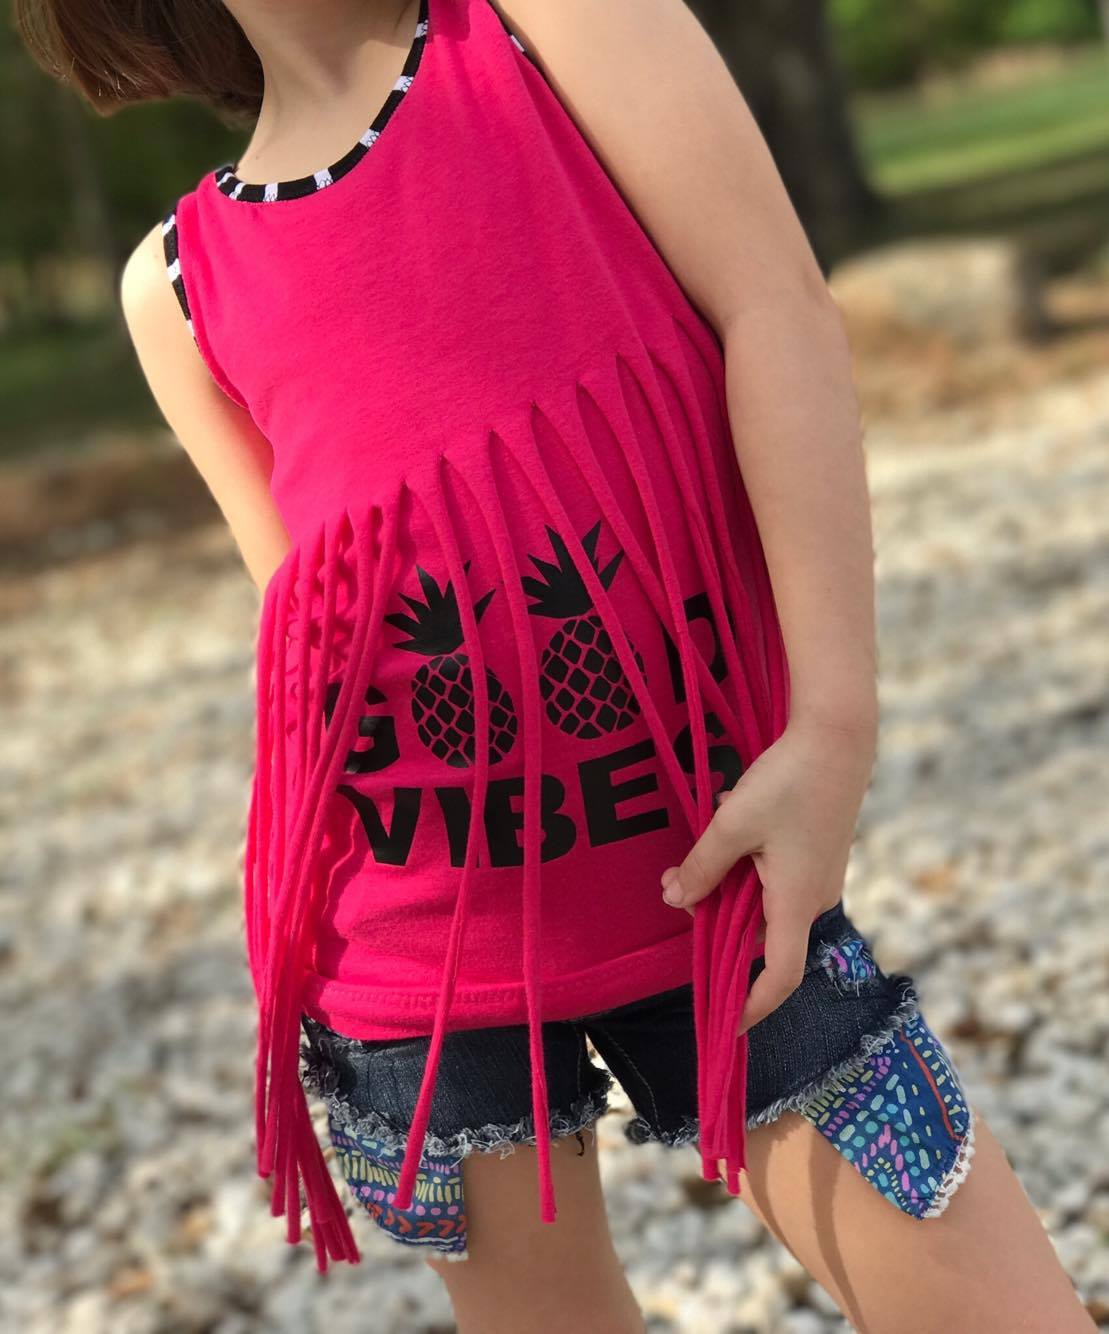

Super duper cute! Are you ready to learn how?

First, print out your tank pattern pieces. We used Leslie's Lace-Option Tank.
Now you're ready to cut the fabric. You will need an inner fabric and an outer fabric. In the photo, the dots are the outer fabric and the solid is the inner fabric. Using the fabric requirements and pieces from the pattern, cut out a front and back piece from both of your fabrics. When you're done, you should have four pieces as shown above: two front and two back.

Take the outer front piece and lay it out on a flat surface. Decide how high you want your fringe to go and mark it with a fabric pencil or a straight edge. I would suggest marking it 1/3 of the way down from the armholes. (On women's medium, I placed my line 6" below the armhole and 12" up from the bottom edge.)

Now cut straight lines 1/2" to 1" apart, starting at the bottom edge and ending at the line you marked. This is easiest with a rotary cutter and ruler, but you can also use scissors. The cut lines don't have to be exact, but you want them to be somewhat equally spaced. Tosha did hers at 1/2" apart and I did mine at 1" apart.
Note: The women's tank curves out at the bottom side edges but you will keep your cuts straight up and down. You'll see why in the next step.

When you have all your lines cut, trim off the outermost fringe piece on each side, as shown above. This will leave enough for the side seams on the upper tank, without having extra bulk on the lower tank.
Your front outer piece is now done!

Repeat the cutting steps with the outer back piece. Be sure to mark the line at the same point as you did on the front.

With both outer pieces fringed, you're ready to sew the shoulder edges and side edges together, with right sides together.

Turn the outer tank right side out. It should look something like the photo above. Set it aside for now.

Take the front inner tank piece. Use a ruler to measure down the amount you did on the outer pieces so you know where the fringe starts when layered.
Now you're ready to add your phrase or design below that line! You can either center it in the open space or even place it along the bottom. Be sure to leave room for hemming or lace, depending on the version you chose!
I used my cricut to cut the letters for "love" and then ironed them on according the package instructions. We have a bunch of fun cut files available, giving you a ton of options! If you haven't used heat transfer vinyl before, you can click here to see that blog tutorial. Or of course you could also use this space on the tank to stencil paint or embroider! You have soooo many possibilities with this style!

You're ready to sew the inner front and back together at the shoulders and sides, with right sides together.

Turn the inner tank right side out. If you're going to hem the bottom edge or add stretch lace, this is the time to do it. It should look something like the photo above.
When you're done, your inner tank should look something like the photo above.

You're ready to put your two layers together! With both of the layers right side out, slide the inner tank inside the outer tank and match up the armholes and neckholes, as shown above. Pin the raw edges of the neck and arms together, matching the seams. They should be a perfect match.

Next, use the instructions from the pattern to add the bindings to the neck and arms, treating the raw edges as if they were one. You don't need to modify the bindings at all. They will fit perfectly according to the pattern. When you're done with the bindings, the top of your tank should look something like the photo above!

Optional: If your strips are still wide and flat so they cover the design too much, you can gently but firmly pull down on them one at a time to stretch them out. This causes the strips to roll in a bit and create more of a fringe effect.

Ta-da! Now all you need is a model!

My girl absolutely adores her new tank!
Now you're all set to get started on your own layered fringe tank! Don't forget that Leslie's comes in girl, tween, and women sizes, *and* you can personalize your layered fringe tank any way you want! Embroider, vinyl, paint, you name it! I can't wait to see what clever designs you come up with. Be sure to come share in our patterns group when you're done!
Let's Create! ~ Kristen

Love this so much!!! <3
ReplyDeleteThe dress in the picture is looking beautiful specially for the kids. This fringe style is looking very pretty and the girl who is carrying the dress is very cute.
ReplyDeleteNice blog content and thank u for sharing.
ReplyDeletekids designer wear india