
It's the 3rd Day of Christmas at CKC and we have a fabulous new free pattern for you today! This one comes to us from our pageant wear designer, Brooklyn. I love that this project can range from super elegant home decor to an everyday-fun-with-the-kiddos project. Here's Brooklyn!

When I was a little girl, every year as a family we made a Christmas ornament. Every year they were different. We collected them, and now as an adult I have a fun collection of homemade ornaments that mark the years as I was growing up. It is fond to look back on and so I’m going to share with you an ornament that you can make, and maybe it can become a family tradition for you as well! No sewing is required, so even the younger kids can help out.

First we will need to gather our supplies. You will need:
-A foam ball in an egg shape, approx. 3” tall
- 57 2” x 2” Fabric squares. (small prints turn out best)
- White Glue
-117 Sequin pins. (Very small pins with small metal heads. They are often brass coated.)
- 8-10” of 1/4" to 3/8” ribbon
- Greenery or another décor to embellish the top. (Bells can also be really cute here)
Here is the construction:

Step 1: First take note that your egg as 2 ends. One end is more pointed. This is the end you will start on.

Step 2: Take one fabric square and place it centered over the end of the foam egg. This will help to hide any foam from peeking out the end.

Step 3: We will secure the square in place with our sequins pins. Dip the pointed end of a pin in the glue then stick it into a corner of the square. Pin opposite corners pulling the square tight over the egg. You should have 1 pin in each corner when you are done.

Step 4: Next we will need to fold the rest of our squares. You can press them with an iron, but I prefer to fold them one at a time with my fingers right before pinning it because it feel like it gives the pinecone more of a fluffy rugged look. You will fold one square corner to corner to create a triangle, then fold the other corners together to create a triangle that is 4 layers thick with folded edges on 2 sides and all the raw edges on the 3rd side.

Step 5: Next we will line up the folded corner of a triangle with the very tip of the egg over the fabric square there.

Step 6: Place a pin in the 2 bottom corners of the triangle to hold it in place. (don’t forget the glue before pinning, you won’t want them coming out)

Step 7: Pin a second triangle opposite the first triangle as shown.

Step 8: Pin 2 more triangles on the other corners of the square. This will complete the 1st layer. Each layer from here on out will consist of 4 triangles.

Step 9: Next we will add the second layer. To do this we will pin 4 more triangles so that the point of each triangle lines up with the gap between triangles from the row above it. To keep the spacing good you will want about half of the triangle on the row above it as shown here.

This is what the second row will look like once it is complete.

Step 10: On the 3rd row we will place our 4 triangles so that each triangle lines up with the points of the triangles on the 1st row. Again so that half of the triangle is on the triangles above it.

This is what it will look like after the 3rd row is completed.

Step 11: Continue pinning rows on following the same pattern as the 3rd row. Each row will line up with the point 2 rows above it. When you are done you should have 14 rows like shown here.

You should now have a neat little square of foam showing on the larger end of your egg.

Step 12: If you are adding the hanger for the pinecone you will take your ribbon and fold it in half. Then tie a knot close to one end. Trim the extra ribbon and seal the ends with a little heat (from a flame) or use clear nail polish.

Step 13: Put a pin directly through the knot of the hanger.

Step 14: Coat the pin with glue (you may want to use a stronger glue here like hot glue) Then press the pin into the center of the square pushing the knot as deeply into the foam as you can.

Step 15: Finally fill in the remaining foam area with your greenery or other décor. Hot glue can help them to stay in place better. I prefer to stick the end of mine into the foam then press it down the side of the pinecone as shown above and below.


Doesn't it look great?
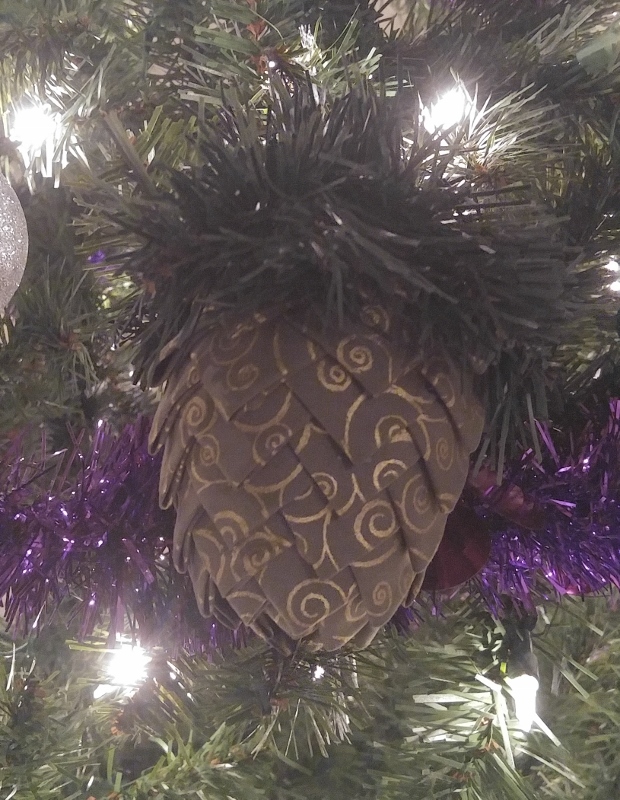
Step 16: Hang it on the tree. Your ornament is now complete!

Step 17: Alternatively, you can make several pinecones and place them in a bowl for a unique handmade table centerpiece.
Thank you so much to Brooklyn for this great tutorial! And now it's your turn! Have fun making all sorts of pinecone decor, and don't forget to come show us when you're done.
Let's Create! ~ Kristen
카지노사이트
ReplyDelete바카라사이트
Way cool! Some extremely valid points! I appreciate you penning this write-up plus the rest of the website is also very good.
Great website and thanks for offering good quality info.nice thanks for share great post here
ReplyDelete카지노사이트
바카라사이트
토토
ReplyDelete먹튀검증
I’m new to this field and this is the most incredible post I’ve ever read about. Thanks so much for your good work.
토토사이트
ReplyDelete안전놀이터 Great write-up, I am a big believer in commenting on blogs to inform the blog writers know that they’ve added something worthwhile to the world wide web!..