social

Facebook Twitter Blogger Pinterest Instagram YouTube

menu

About Us Contact Us News Faq Tutorials Our Shop

giveaways ad

Tuesday, September 30, 2014

Quilted Ornaments


Look at these adorable quilted ornaments that Jennifer Watkins is going to teach us to make today!  They look like they took hours and possibly an engineering degree to make, but you'll soon see that with this tutorial they're really not all that tricky and you can make them too! Ornaments aren't only for the Christmas tree - they can be dressed up cute for all occasions. Here is Jennifer with today's tutorial: 


Hello everyone! Today I am going to show you how to make TWO
different fabric quilted ornaments. These are such darling little
things!! These ornaments would be perfect for birthdays, Christmas
gifts or a just-because gift for someone special. And the best part of
it is that they only take a small amount of fabric scraps!! Let's begin,
shall we?

Create Kids Couture Scavenger Hunt Winners!!!

It's the moment all your crazy hunters have been waiting for......the winner's are being announced! Sorry for being late but WOW was it super fun checking all the links your guys posted to make sure they were all correct. Drumroll please....

Grand Prize Winner is: Heather Whitlock 
She won these awesome prizes: 


All 11 paper patterns for you and a friend AND 25 PDF Patterns of your choice!

Fat Quarter bundle and Rolie Polie of one of Riley Blake Designs newest lines
Fabric Bundle from Art Gallery Fabrics
$50 Store Credit to Katie's Quilt Shop
$50 Store Credit to Create For Less
$50 Store Credit to Bobbin' For Appliques
August's Box from Stitch Box Monthly (item pictured from previous month)
$30 Store Credit to Giggle Berry Clothing
Christmas Accessory Set from Shadandy Shoppe

First Runner-Up Winner is: Hannah Wetterstrom
She won these great prizes:


All 11 paper patterns for you and a friend AND 15 PDF Patterns of your choice!
Fat Quarter Bundle from Andover Fabrics
2 yards of fabric from Polka Dot Umbrella Boutique
$15 Store Credit to Breezy Lane Embroidery
Frozen Necklace from The Little Black Bow
Black and Gold Bow (similar to picture) from J. Elisyn Boutique
5T Dress (pictured) from Unique O's

Second Runner-Up Winner is:  Lucero Rico
She won these awesome prizes:

All 11 paper patterns for you and a friend AND 10 PDF Patterns of your choice
Fat Quarter Pack from Benartex

Girl's and matching doll purses (Doll not included) from Punky Fae
Crown Necklace from Stewiecakes Boutique
$15 Store Credit to Cute Nails by Abbey

Third Runner-Up Winner is: Kendra Watkins
She won these spectacular prizes:

All 11 paper patterns for you and a friend, 5 PDF patterns of your choice, AND 2 surprise yards of our in-stock fabrics!
Marblehead Blobal Brights Snack Pack from Fabri-Quilt

$15 Store Credit to Pigtails and Lace Designs
Fourth Runner-Up Winner is: Axa Lima 
She won this great prize:
All 11 paper patterns for you and a friend, 5 PDF patterns of your choice, AND 2 surprise yards of our in-stock fabrics!
Congratulations to ALL the winners and thank you to everyone who participated! We have emailed all of the winners and they have 24 hours to respond before NEW winners will be chosen! 

Happy Sewing!
Shannon and Tiffany

Saturday, September 27, 2014

How to Embellish your Anna-Inspired Dress

Have you seen our new Annabelle's Princess Dress-Up Set pattern that was released yesterday? It is so versatile to make any color/inspiration of dress that your little princess desires!  Be sure to check out the image gallery at the link above to see all our tester versions. One that has been a favorite for obvious reasons is the Anna inspired version. Today we have Nikki here with us, our fabulous designer of Annabelle's, to help you make yours the perfect Anna inspired dress. Here's Nikki! 


I know many of you are wanting to embellish your Anna inspired dresses so we have 
decided to write a blog to help you along in the creative process. The two options I am 
going to share with you are felt and paint. You can also choose to embroider with an 
embroidery machine. 


First we will share with you how we did the felt design. We are including a template for the design we 
used. My daughter loves it on hers. You will need felt in each color you want on the dress, a fabric 
marker, scissors, and permanent fabric adhesive. (You can choose to sew the pieces on. I just found fabric 
glue to be easier). 

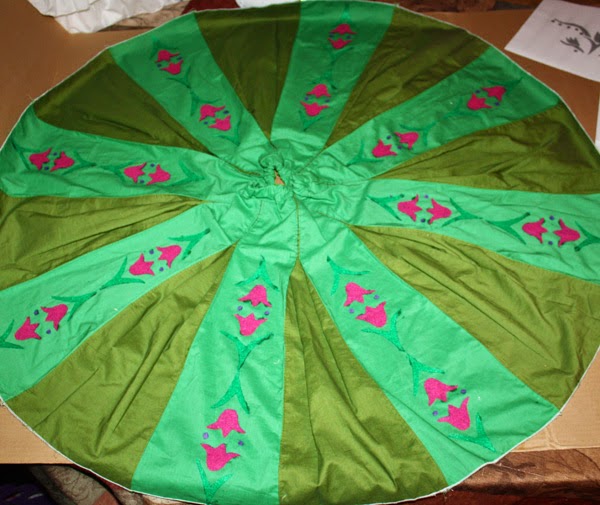
Print the template out HERE and cut out the pieces. You will need to determine how many of each design you need for your dress. For my dress which is inspired by the Anna Coronation Dress I needed 1 set of the bodice design and 16 sets of the skirt design (2 for each of the 8 panels). 

Now you will trace the designs onto the felt using the fabric marker. You can trace multiple onto the sheet 
before cutting them out. After you have traced them, cut them out. 


Here is everything for my top laid out before I started. 


Now you need to place the pieces onto the top/skirt in the order you want them to be. Once you get the 
pieces laid out how you want them to look, pick them up one at a time and using the fabric glue, glue them in place. 


My glue had to dry for 4 hours before moving and is washable after 48 hours. 
  
Now do the same thing with the skirt and you will have one happy little girl with an Anna inspired dress. 


That was simple, right? 


Now I will tell you how I embellished my other Anna inspired dress. This one requires the template 
printouts, a fabric marker, felt, and puffy paint in the colors you chose. 

I am going to start on the skirt with this one because it is a little more in detail. First thing to do is print the 
template. The scallop curve is drawn on it. I cut 2” strips of felt and used it as a guide to cut the scallops. 
Just cut the scallop piece and lay it on the 2” strip of felt, then trace it with a fabric marker across the top 
of the strip. You will need to move and trace until you have a piece long enough for the bottom of your 
skirt (mine ended up being several strips that I just stitched on). After cutting out those strips pin them on 
to the bottom of the skirt. 


Now use your sewing machine to topstitch this piece on. 


Now that you have the scallop edge along the bottom you will take the skirt template piece and use it as a 
guide to draw the design on the skirt using the fabric marker. It will look something like this when done. 
Keep in mind this is just a suggested design and you can do any design work you want on the skirt or top. 


Now trace the lines you just drew with the colors of puffy paint you chose for each part, as shown here. 


You can now use the bodice design template to do the same thing with our top. Here is a pic of my 
husband working on mine for me. Had to get him involved in all of this. 


Just let the pieces dry over night and watch the look on your little girl’s face! 


Of course if you have an embroidery machine you can also embroider it. There are many people selling the 
embroidery design on Etsy so that you can do that. We just wanted to give you a couple more options that 
you can do even without an embroidery machine. 

 ~ Nikki ~

Thursday, September 25, 2014

Adding a Snap Closure to Willow's Wrap Jacket


By Katie Skoog

Is everyone getting ready for the fall and winter months that are creeping up too fast? I made my little one a Willow's Wrap Jacket and wanted it to stay closed and straight but my girl is just a wiggly little thing! So I decided to pull out my trusty KAM snap tool to fix this! If you don’t have a KAM snap tool and want something similar, consider using hook and eye closures.


To add the hidden snaps to your already-made Willow's, first we will seam rip the front sash.


If you haven’t made the Willow's yet, make it following all the directions up to the step where you attach the tie. Before you attach the tie, put it on your little one and wrap the jacket the way you want it to sit on her. Next, mark where you want the snaps to go. You will want the snaps to be covered by the tie so no one knows they are there. When figuring out your placement, make sure they are towards the center of the tie area. You don’t want to sew over a snap when attaching your tie!


I am adding three snaps to each side. This will make it adjustable for growth and because I plan on using this jacket all winter and to be able to layer this super cute jacket over all her other layers.
Now that you have your snap placement marked, follow your manufacturer's directions for applying the snaps. If you need extra help with snaps, you can refer to our blog post on How to Use KAM Snaps.


Now following the directions in the Willow's pattern, fold the sash over the snaps and finish attaching your tie.


That’s it!! How easy was that!!! 


Now your little ones can crawl, run, and play and their jacket will stay in place and look fantastic ALL the time!