social

Facebook Twitter Blogger Pinterest Instagram YouTube

menu

About Us Contact Us News Faq Tutorials Our Shop

giveaways ad

Tuesday, December 31, 2013

Business Card Holder

Today is Tuesday and you know what that means!  We have a free sewing tutorial for you. 


I love business cards. They're small and contain concise info that can be extremely useful. Whether you have your own business cards to hand out or you're the customer collecting cards, these card holders can be really handy!  I try to keep my cards on me at all times and that means a little stack in my coat and jeans pocket and diaper bag and camera bag, and anywhere else I decide to stash them as I'm leaving the house. (I'm pretty sure I waste a lot of cards with this little habit.)  I LOVE the idea of keeping my business cards in a safe little cover where I can always find them. And look how cute the holders are! 


The pattern shows how to make this card holder that opens up to two pockets perfectly sized for business cards.  When you're ready to secure them, you just fold the cover closed and secure it with the attached elastic. Your cards will be safe and cozy in your purse or pocket any time you need them!

Here's where you can download the free PDF pattern to make your own Business Card Holders

We hope this tutorial is helpful to you! Feel free to share with your friends. 

Let's Create!  ~ Kristen

Thursday, December 26, 2013

Printable Thank You's

Did you all have a wonderful Christmas?  My family did and now we're basking in the glow of toys and games and oh-so-many treats. I'm always touched by the generosity of family and friends at this time of year. An after-Christmas tradition I have is to make homemade cards to send out to family who sent us gifts. They never seem to expect it but are happy to know that we were grateful enough to say thanks. Last year I had the kids write their own thank-you's. Aside from taking forever to get them written, it was a really rewarding experience for all of us.  I highly suggest it to all parents out there. And we're even going to make it easy for you! 


We've created this little Thank You note template for you to print out. (Two per page!) You can have your kids fill in the blanks, color the pictures, and then send them to your loved ones. It's that easy! 

And just for the record, I think these would be really cute for adults to send as well. We're all young at heart, right? If any of my adult family members took the time to color and send one my way, I'd be delighted!  You can download our free printable Thank You Template here

Let's Create! ~ Kristen 

Tuesday, December 24, 2013

Merry Christmas!

Merry Christmas!  At CKC we are so thankful for all of you and we want to spread a little Christmas cheer. We put together a challenge for ourselves this month, where we each created a Christmas themed dress or costume using some of our favorite patterns. Consider it a Christmas card from us to you! Our kids are our inspiration for all of our creations and we have been so excited to share them with you today.  Here are the CKC Kids, all decked out for Christmas:


Model: Natalie
Mother: Tiffany
Pattern: Tori's Bustled Princess Dress
Unique Tradition: Each year I have the kids make a new Christmas tree ornament. On Christmas Eve they also get matching PJ's and a handmade stuffed animal. 


Model: Charlotte
Mother: Shannon
Patterns: Penny's with stripwork ruffle and longer straps, paired with a new pattern and Jenna's Ruffle Pants. 
Unique Tradition: We listen to Christmas music non-stop all the way from Halloween until New Years. We had a Christmas wedding so we love all the holiday music.  

Monday, December 23, 2013

Adding a Trim Band


What a sweet little dress on a sweet little girl.  I really like the bottom trim band on her dress. I am a big fan of ruffles but sometimes it's fun to mix it up a little and use a trim band instead. Have you ever wondered how to do this? We're going to teach you how!


The easiest way to make a trim band is to use a pattern that has a ruffle at the bottom. You will cut the trim band to be the length of the ruffle, but for the width you cut it to match the width of the dress where it will attach.  (That is generally half of the width of the ruffle.)  I will walk you through the process: 


I made this dress using our free Marilyn's pattern. Instead of cutting out two ruffle pieces like it calls for, I only cut out one ruffle piece.  The one ruffle piece measures the exact width of the dress at the bottom where it attaches. 


Here is what my pile looked like before I started. Notice I cut only one ruffle piece instead of two.


Take the trim band and fold it in half width-wise and sew, creating a large loop. Do a rolled hem on one of the long edges. 


Now we are ready to pin the trim band to the dress. (We were able to skip the gathering step that we would normally do for the ruffle!)  

I wanted to show the difference between the ruffle and the trim band, so I made two dresses of the same size, side by side: 
  

 See how the dress on the left has a gathered ruffle to match the width. The dress on the right also matches the width but it was not gathered. Now both are ready to sew in place and top stitch. 


It's that easy!  They create two very different looks, don't they?  And the only difference between the two is the width of the ruffle/trim band. Time to model both dresses on my cute little neighbor girl: 


Ruffled Marilyn's 


Trim Band Marilyn's

Isn't she cute!?

If you are using a pattern that does not call for a ruffle, you can still add a trim band. Just cut fabric to be the length that you want the band to be (plus 5/8" for seam allowance and rolled hem) and then cut it to be the width of the dress where it will attach (plus 3/8" for seam allowance).  

You can add trim bands to anything you want: dresses, skirts, tops, pants - and even store-bought items. They are great for adding length and/or style.  If you have been wanting to try out our women's patterns but are afraid to wear ruffles, this is a great option! It's also good for little girls who think they are getting too big for ruffles. Switch to a trim band instead. I also like that I can reuse the same pattern to make multiple outfits for my daughter - little variations like this help mix it up a bit. I hope you'll give trim bands a try and share your photos with us when you're done.

Let's Create! ~ Kristen   

Saturday, December 21, 2013

Twelve Days of Christmas Recap and Video Winner!

We have a winner!  Thanks for all your video entries in our Twelve Days of Christmas singing contest! The winning video is coming right up for your viewing pleasure.  But first, let's review the new free tutorials that we shared over the past couple weeks:  

  On the Twelfth Day of Christmas, CKC gave to me...


Cover for my Tablet


Amazing Paper Dolls


 Fancy Fabric Crown


 Scrappy Photo Banner


Pretty Lace Bracelet


 Fox named Felix 


 Crayon Roll for kids


♪   Cozy for my Cup!   


A handy Scrap Catcher,


 Stylish D-Ring Belt,


  Ruffled Camera Strap --


And a Stocking to put my gifts in!  
 
That's a lot of love from CKC to you! We hope you have enjoyed it as much as we have.  

And now to announce the winner of the video singing contest.  Our CKC staff has chosen the video entry from JACLYN WEIST to be our winner!  Here it is: 


Congratulations to Jaclyn and her little clan!  They appear pretty happy to help their mama out. I bet she will be able to put her prize of three free CKC patterns to good use!

Thanks again to those who entered our contest. The videos were fun to watch. We hope you all have a very Merry Christmas! We have just a few more days to get those projects finished. 

Let's Create!  ~  Kristen  

Thursday, December 19, 2013

Monthly Mash-Up: Yvette's and Jewel's


On the blog we have occasionally been posting some "mash-ups" using CKC patterns and they're always a big hit.  We decided it's time to make the mash-ups a regular event and we are even taking it up a notch. 


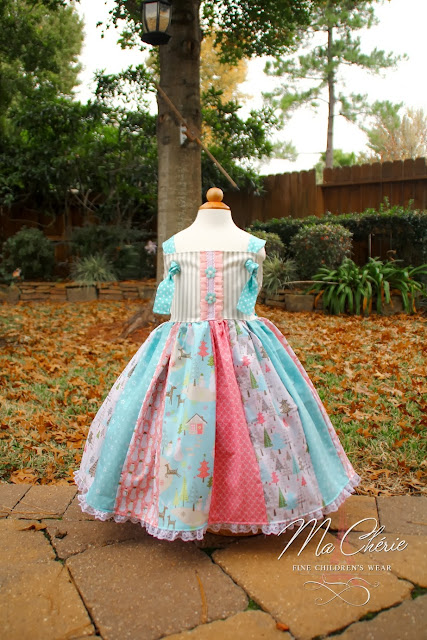
We have asked Deborah Koch from Ma Cherie Kids to do a mash-up for us every month using CKC patterns. If you're not yet familiar with Deborah's work, you will be soon! She caught our eye because of her gorgeous combinations of fabrics and the special touches she adds to her outfits. We initially planned to start Deborah out in the new year but she already had a fabulous Christmas mash-up ready to go for us! Are you ready to see? 


Deborah chose to combine the bodice from Yvette's Knot Dress on the left -- with the skirt from Jewel's Stripwork Dress on the right. What she came up with was this gorgeous combination, perfect for Christmas:


Isn't it stunning? Let's take a closer look at its details. 


For the Yvette's bodice she used gray and white striped Moda, combined with aqua polka dots from Joanne's. The ruffle is traditionally horizontal on Yvette's but she chose to put it on vertically - that adds a nice touch! She found the pink ruffle detail at Hobby Lobby (pre-made), and the accent flowers came out of her personal stash. The pearls on the flowers were sewn on by hand. 


The stripwork fabrics on the Jewel's skirt are Riley Blake. I love how pretty and whimsical they are. Then she added a touch of lace at the bottom of the dress to finish off her masterpiece. 


This one-of-a-kind Christmas dress looks just darling on her little model! 

Thank you to Deborah for putting this together for us. We can't wait to see what she comes up with next month! If you'd like, you can find Deborah's Facebook Page HERE and her Etsy Page HERE


We hope you feel inspired today. It seems like the perfect day to whip up some hot chocolate, turn up the Christmas music, and keep on sewing. 

Let's Create! ~ Kristen 

Wednesday, December 18, 2013

Tips and Tricks: Lining Up Stripes

Today we're talking about stripes! I love stripes!  I know that horizontal stripes are supposed to be horrible for us to wear. But I love them and I deny that rule of thumb! Sure, our eyes may be trained to perceive things as wider when they have stripes going across them. But what's wrong with appearing wider if we look FABULOUS while we're at it? I say wear the stripes!  But even if you disagree with me, I think we can all agree that kids can wear stripes any way they want -- as long as the stripes are straight!


And straight is what we're talking about today. I'm going to give some tips on how to make our stripes line up. It's really not too complicated. The important thing is that we pay attention to the stripes on every single step, from cutting to pinning to sewing. If we fail to do this, our stripes aren't going to line up simply by magic!  We need to cut our pattern pieces so that the bottoms all line up at the same place on the lines. That's what I did to make the stripes line up in the picture above. (With a sleeve that curves under like that, the sleeve stripes will get "off" of the bodice stripes once it is under the curve - but the two sides do match each other and the top half is all lined up neat and tidy.) Lining up stripes is especially easy to do with CKC peasant tops because the sleeves and bodice all start out as rectangles - straight lines! 

Tuesday, December 17, 2013

Twelfth Day of Christmas: Tablet Cover

It's the Twelfth Day of CKC Christmas already - can you believe it? We hope you have enjoyed all of our free tutorials! Today we are sharing our final one and you're going to love it. But first we want to announce that we're having a Twelve Days of Christmas Singing Contest! Oh yes we are, and the winner will win a 3-pattern pack from CKC. All you need to do is record a video of yourself, or kids or spouse, singing the song lyrics below (one time through is enough). Your voices don't have to be amazing but we'd love to hear you sing your heart out for all of us! To enter our contest, please email your video or youtube link to kristen@createkidscouture.com. We need to receive your videos by 6 pm EST on Friday, December 20 to be eligible. Please be aware that the winning video will probably be posted on the blog and Facebook. Let's all have some fun with it as we share the CKC love!

Now for today's free tutorial:  


  On the Twelfth Day of Christmas, CKC gave to me...
A Cover for my Tablet
Amazing Paper Dolls
 Fancy Fabric Crown
 Scrappy Photo Banner
Pretty Lace Bracelet
 Fox named Felix 
 Crayon Roll for kids
♪   Cozy for my Cup!   
A handy Scrap Catcher,
 Stylish D-Ring Belt,
  Ruffled Camera Strap --
And a Stocking to put my gifts in!  


Today we have a free tutorial for you to make a cover case for your tablet!  I love how festive this cover is. We give instructions for making four different sizes of tablet covers, which will fit fourteen different tablets on the market! There's a pretty good chance that one of these will fit your tablet or your loved ones' tablets. Think of what great gifts these would be! 


 Inside the cover, your tablet will be held snugly in place by elastic on all four corners, and there's even a pocket there for whatever you like to stash in pockets. (Um, everything?) The tablet is fully accessible and easy to use even while it has the cover on.


You can also make a cover for your more traditional type of tablet!
(I'm thinking this would go perfectly with our Crayon Roll as a gift.)


Each time you're done using your tablet you can just close it right up and it stays safe and secure, not to mention stylish, until you need it again. (Probably five minutes later.)

Go ahead and give our tablet tutorial a try for yourself. Then if you're like me, you'll get hooked and want to make one for everyone you know!  (Hint: These can be done in manly styles too! Think faux leather or his favorite sports team.) Click here to download our free Tablet Cover Pattern. We would love to see the covers you make for your tablets, so please share!

Let's Create! ~ Kristen


ps - Please note that some of "fusible fleece" measurements are off. We are getting it corrected, but in the meantime you will want to wait until you get to that step before cutting the fusible fleece. Cut the fusible fleece 1/2" smaller than your finished size before inserting it.

Monday, December 16, 2013

Eleventh Day of Christmas: Paper Dolls

It's Kristen here and I have a little confession to make. First of all, I have never been one to tell secrets. I kind of keep to myself. But I have to say, if anything has ever tempted me to spill the beans on a secret, it was today's tutorial! That probably sounds a little crazy - but just wait and see how fabulous it is. I have been counting down the days to its release! (But no, I didn't tell anyone.) So now that I gave you totally high expectations, here are Tiffany and Shannon to give you our fabulous free tutorial for today: 


  On the eleventh day of Christmas, CKC gave to me...
Amazing Paper Dolls
 Fancy Fabric Crown
 Scrappy Photo Banner
Pretty Lace Bracelet
 Fox named Felix 
 Crayon Roll for kids
♪   Cozy for my Cup!   
A handy Scrap Catcher,
 Stylish D-Ring Belt,
  Ruffled Camera Strap --
And a Stocking to put my gifts in!  

If you're like us, you spent many days as a child playing with paper dolls. However, paper dolls are so hard to find these days, so we thought "Why not make our own?!?" When we came up with this crazy idea, we weren't really sure how to execute it so we turned to our staff for ideas. Lo and behold, the amazing Maria is a woman of many talents and was able to take this picture:


...and turn it into our newest "masterpiece"! Check out the paper dolls for yourself below, including the 8 different versions of our patterns that we included! We have BIG plans for these little girls in 2014! We're pretty sure you all know how paper dolls work, but we're going to include some info below to get you on your way!


  • Download paper dolls here.
  • Make sure to use 100+ lb cardstock. Anything lower than 100lb for these dolls will not work. This cardstock can be found at Michael's for $.69 a sheet. For the clothes, I've been using 50lb and its perfect!
  • We recommend you use an exacto knife to cut the red slits for the clothing tabs to slide through.
  • Print the clothes on white cardstock to have your children color and decorate the clothes themselves; they can be designers like mommy!
  • Print the clothes on patterned scrapbook paper for fast and cute clothes!
  • Try printing the dolls and clothes on magnet paper for a fun alternative to the standard paper doll! This would be great for traveling as well!
  • Use the clothes for yourself to arrange fabrics on for your future designs!
  • Share with your boutique customers so that their children can have dolls to match their outfits as well!
  • Great stocking stuffers or after school crafts for kids!
After you cut out your dolls and your stand, fold the stand in half and slide through the notches to have it stand as pictured below. 


If you have any great ideas for these dolls, we would love to hear! We can't wait to print these out for our own girls to color and start designing! They are going to flip when they see that their dolls look like them! 

Happy Designing!
Shannon and Tiffany

Friday, December 13, 2013

Tenth Day of Christmas: Fabric Crowns

It's free tutorial time again! 


  On the tenth day of Christmas, CKC gave to me...
A Fancy Fabric Crown
 Scrappy Photo Banner
Pretty Lace Bracelet
 Fox named Felix 
 Crayon Roll for kids
♪   Cozy for my Cup!   
A handy Scrap Catcher,
 Stylish D-Ring Belt,
  Ruffled Camera Strap --
And a Stocking to put my gifts in!  


Look how amazing these crowns are!  Perfect for boys and girls, this free pattern will allow you to make several different types of crowns. They can be pointed or curved, ruffly or plain - and they are even reversible!  

The fabric crowns in this pattern can be made with either an elastic back or ribbon ties. The elastic tie is based on an average head circumference, but we also show you how to make it a custom fit. The elastic version is easiest to get on and off, but the ribbon tie is also good if you want it to fit your kids as they grow or to share with siblings.

I love that these crowns are so sturdy! I can't even count how many store-bought dress up crowns my daughter has gone through - they always snap easily or bend out of shape. But that wont happen with these crowns! They are comfy and made to last.

 Click here to download the free PDF pattern for our Reversible Fabric Crown. Your little princes and princesses will be stylish in no time.

Let's Create! ~ Kristen 

Thursday, December 12, 2013

Giveaway with Rowenta


It's time for another awesome video featuring an amazing Rowenta iron! If you're familiar with us here at Create Kids Couture, I'm sure you've heard us mention Rowenta before as we are very loyal Rowenta customers! I, personally, grew up watching my grandma do all her quilting with her Rowenta Iron and Janome Sewing Machine so when I started sewing, you better believe I made sure to have my Rowenta Iron and Janome Sewing Machine! lol. I actually received my Rowenta iron 8 years ago and it's still going strong, but I was lucky enough to receive one of the newest Rowenta irons and I was not at all surprised to see that it's still the same exceptional quality as my original iron but with newer, and even better features!

Rowenta DW9280 Steamforce
When it comes to boutique clothing, an iron is an essential item needed to care for them. We wrote this blog post about caring for boutique clothes when CKC was just a baby--it's almost 2 years to the day it was written--and we have referenced it many times. We're pleased to be able to expand on one particular section though: Ironing! If you're not quite sure how to iron those ruffle to make them look good as new or how to iron gathered patchwork so it doesn't have a million creases, then we created a video just for you! We show you exactly how to do these things--and more!--in the video below. So sit back, relax, and take notes! Then scroll down below the video to enter the exclusive giveaway with Rowenta, where you have the opportunity to win the Rowenta DW9280 Steamforce iron as featured in our video!!!